Project 3: Mini-ELF Disassembler
Project 3: Mini-ELF Disassembler
(Strongly recommend you first read sections 4.1.1 to 4.1.3 of your textbook)
This document is based on a project originally written by Dr. Michael Kirkpatrick.
This project serves as an expansion of the Mini-ELF utility from the first and second projects, and the goal is to reinforce assembly code concepts and the standard components of executable files.
In this project, you will implement the "fetch" cycle of a von Neumann architecture by reading machine code instructions from memory and populating a C‐struct with the decoded instruction details. You will also write a disassembly routine to output the machine code as human-readable assembly instructions. Finally, for full credit you will also output some details about the data segments of an executable file.
For generic project instructions, refer to the project guide. Here is the path to the starter tarball file on stu:

The project distribution folder also contains a pre-compiled solution to projects 3’s p3‐diass.o Keep a backup copy of this pre-compiled solution handy in a separate folder, since every time you run “make clean”, it will be erased and you will need to get a new copy of p3‐diass.o . This pre-compiled solution is intended help you first develop the main.c driver of project 3 ( about 2 hours and ~30 lines of code). During this phase, rename your p3‐diass.c as p3‐diass.temp so that it does NOT get compiled/linked when running make. Once your main.c passes all integration tests, you may now erase the pre-compiled p3‐diass.o and start developing your own p3‐diass.c At all times, you must use your latest, and greatest, versions of p1‐check.c and p2‐load.c These MUST also be part of your submission.
Failure to submit the source code of the previous projects will result in a grade of ZERO.
IMPORTANT: The test suite is subject to change. I will announce how you can get the updated test suite via a Canvas announcement. Make sure you use the most recent version before you make your final submission.
Command-Line Parsing
As in project 2, you will expand your program to recognize two new command-line options: "‐d" to disassemble code and "‐D" to disassemble data.
Part 1: Y86 decoding
The first step of the standard von Neumann process involves fetching the bytes of an instruction from memory and decoding the instruction. Please, refer to the updated y86.h for the data structures that are relevant to Y86 instruction encoding.
To decode the instruction, you will examine the first byte of the instruction to determine what kind of instruction it is (we recommend using a switch statement for this). Depending on the instruction type, you may then need to read additional bytes to determine things like register numbers, immediate values, or memory addresses.
In your main() method you'll need to step through executable segments, decoding all of the instructions. Note that Y86 uses a variable-length instruction encoding, so you will need to decode the current instruction in order to find out how many bytes forward to skip to get to the next instruction.
As an example, consider the simple.o file in tests/inputs. Here is the output of the previous project:
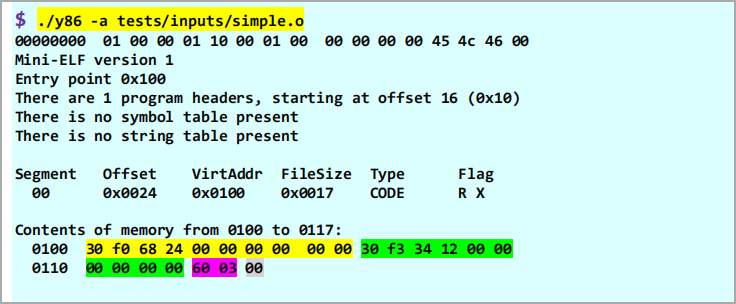
Examining the program headers, we see that there is a single 23-byte code segment that is to be loaded at address 0x100 in virtual memory. The first opcode is 0x30, which indicates an irmovq instruction. The second byte is 0xf0, which indicates that the destination register is %rax (register 0 in the low-order 4 bits and f in the high-order 4 bits). The next eight bytes contain the immediate 64-bit value 0x2468 stored in little-endian format. The next instruction begins at address 0x10a, and has a 0x30 opcode. If we were to continue this process until the end of the segment, we would find the following instruction sequence (with associated assembly code):

Part 2: Y86 code disassembly
To disassemble Y86 machine code, you will need to write a routine that prints out decoded instructions in a human-readable form as shown in the following example:
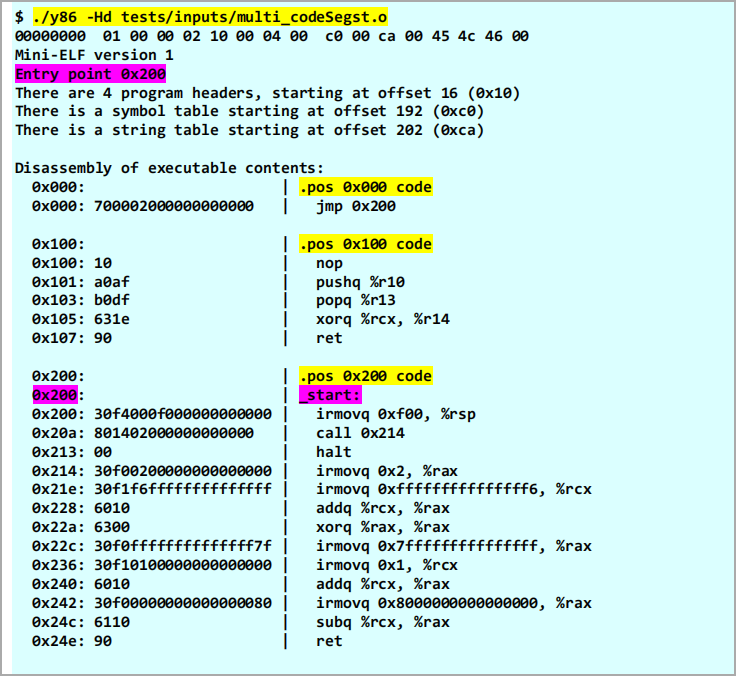
Each segment will start with a .pos line indicating the starting address of the segment. The _start: label must be provided only for the instruction that is identified by the Mini-ELF header as the entry point. The remainder of the lines consist of the address of the instruction, the memory bytes for it, and then the disassembly of the instruction. If there are multiple code sections, you should print all of them with the appropriate .pos header. Notice there is a trailing empty line after printing the code of each segment. See tests/expected/B_simple_multi.txt for an example of multi-segment disassembly.
Part 3: Data disassembly
Some Y86 object files have data segments as well as code segments. There are two cases for data segments: 1) read-write data and 2) read-only data. For the first case (read-write), the segment by convention consists of global variables that are all 8 bytes in size. To disassemble this data, simply print “.quad“ followed by the value of the variable in lower-case hexadecimal. Here is an example:

For the second case (read-only), the segment by convention consists of a sequence of null-terminated ASCII-encoded strings (just like in C). To disassemble this data, you will need to scan until you find the trailing null characters that separate individual strings. Here are a couple of examples:
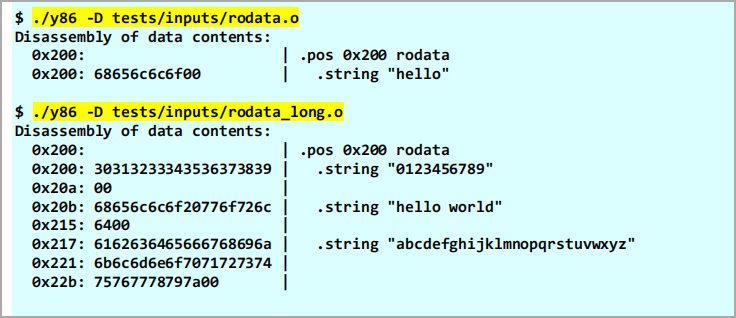
As can be seen in the second example, the strings may be longer than ten characters. In this case, you should print the entire string on the first line, but wrap the hex digits to fit inside the ten-byte hex field.
Requirements
Here are the required functions that you must implement in your p3‐disas.c: (Unit tests will be used to validate this portion of your submission.)
● bool parse_command_line_p3( int argc, char **argv, bool *header, bool *segments , bool *membrief, bool *memfull, bool *disas_code, bool *disas_data, char **file );
As in Projects 1 and 2, set the Booleans pointed to by the parameters as appropriate based on the command-line parameters. The two new parameters disas_code and disas_data correspond to the "‐d" and "‐D" flags, respectively. In case of any parsing errors, ALL Boolean flags must be set to false .
● y86_inst_t fetch ( y86_t cpu, memory_t memory );
Fetch the instruction and supporting operands from memory. The incoming cpu parameter has been pre-loaded with the Program Counter value, i.e. the address of the instruction to be fetched, which is then returned by this function. Study y86.h for the declarations of the y86_inst_t and y86_t structures.
● void disassemble_code ( memory_t memory, elf_phdr_t *phdr, elf_hdr_t *hdr );
Disassemble an entire code segment. This function should repeatedly call fetch to retrieve instructions from the segment and print the address and hexdump of the code, then call disassemble (see next) for the actual assembly code text. Essentially, this function should implement a three-cycle von Neumann architecture where the stages are "fetch," "disassemble," and "update PC," and where the PC update is just an increment based on the size of the current instruction (i.e., no control flow changes). The function takes a pointer to a single program header (phdr) that describes the section to be disassembled as well as a pointer to the original ELF header (hdr).
● void disassemble (y86_inst_t inst);
Disassemble a single Y86 instruction inst. This should ONLY print the assembly code (i.e. the mnemonic and operands). As for all of the surrounding data (e.g., address, hex, etc.) described above, these should be printed by the disassemble_code function (see above)
● void disassemble_data ( memory_t memory, elf_phdr_t *phdr );
Disassemble a single read-write data segment that consists of a sequence of “.quad” assembler directives. The segment is described by the phdr parameter.
● void disassemble_rodata ( memory_t memory, elf_phdr_t *phdr );
Disassemble a single read-only data segment that consists of strings. The segment is described by the phdr parameter.
In addition, you must implement your main() function in main.c such that it expands on that of project 2. If the "‐d" was passed at the command line, you'll need to loop through all of the CODE segments, decoding all of the instructions by calling disassemble_code.
Next, if the "‐D" was passed at the command line, you must loop through all of the DATA segments, decoding all of the data by calling either disassemble_data or disassemble_rodata, as determined by the p_flag of each data segment.
You are free (and encouraged!) to define multiple helper functions, as well. However, these must be fully contained in your .c files. Remember, you are NOT permitted to change any of the .h files. While you are free to call them anything you want, good coding practices recommend you provide meaningful names and clear purposes. Regardless, the functions above must execute correctly according to specification.
Error checking
Robust software proactively checks for potential errors and responds appropriately when an error occurs. Failure to build robust software leads to security breaches, lost sales, and other problems; this failure is not acceptable. Our grading procedures will try to break your code. The following list is a sample (not complete) of the types of errors we may test:
● Passing NULL values in pointer parameters.
● Passing a file that contains invalid instruction opcodes.
● Passing a file with addresses that would extend beyond the maximum MEMSIZE value.
● Passing a file with program headers that have invalid flags or types.
● Passing invalid PC values (i.e. outside the memory address range) to the fetch() function.
This situation is handled as in the "invalid instruction opcode" case.
● Passing invalid instructions to disassemble().
If an invalid opcode is detected during the disassembly routines, the program should print the error message "Invalid opcode: 0xYY" where YY is the value of the opcode. Disassembly of a segment should not continue past an invalid opcode. However, if there are more code segments at other memory regions, the program should continue to disassemble those. Refer to tests/expected/A_invalidOpcode.txt for illustration.
The above list is not necessarily exhaustive, and you should think carefully about what sort of errors might occur so that you can prevent them or perform additional error checking as needed.
In particular, we will also use valgrind to detect memory leaks. Failure to respond appropriately will result in grade reductions.
Hints
● Start early. This project involves writing significantly more code than the two previous projects.
● Work incrementally. As always, start small and gradually add more functionality. In addition, DO NOT FOCUS on fetch() at the expense of the disassembly methods; you will get no credit for a full fetch implementation if the disassembly portion is not also working. Instead, implement the first part of fetch() by determining what kind of instruction it is by examining the opcode. Start with the one-byte instructions and work your way up to the ten-byte instructions. Implement disassembly for the instructions as you implement fetch so that you can test them side-by-side. Leave the data disassembly for last.
● Use switch statements and bitwise operators. This will make your fetch() and disassemble() functions much cleaner and easier to read.
● Don't forget endianness. When printing the memory bytes for an instruction, the bytes have to appear in their memory order (i.e. Little Endian). However, when printing their interpretation in an instruction, you have to display them as the correct (i.e. Big Endian) value.
● Make sure you understand y86.h. This file contains a number of definitions and declarations that will make your work significantly easier if you use them properly.
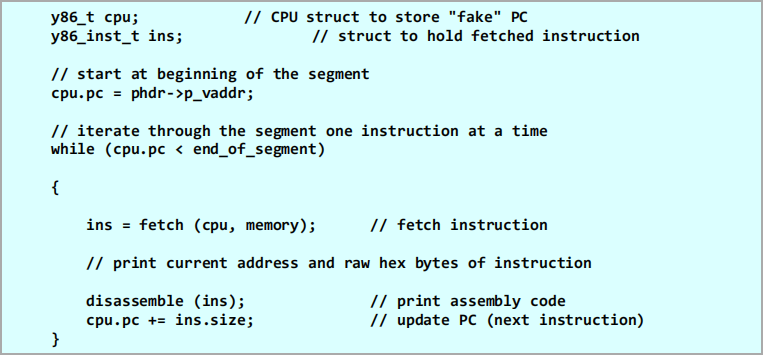
To help you get started, here is the general framework (not complete!) for the three-stage von Neumann cycle that you must implement in disassemble_code:
Grading
The following requirements are necessary to earn a grade of 'A' for this project:
1. Correctly decode and disassemble all one-byte instructions
2. Correctly decode and disassemble all two-byte instructions
3. Correctly decode and disassemble all instructions
4. Correctly decode and disassemble all data segments
5. Accept all valid Y86 Mini-ELF files
6. Reject all invalid Y86 Mini-ELF files
Completing steps 1-3 are required to earn a grade of 'B' while completing only steps 1-2 will yield a maximum grade of 'C'. You may receive a grade of 'D' for completing only step 1. Note that these are the maximum grades you can earn. Inadequate error checking, failure to adhere to the coding standards, or deviations from the submit procedures will result in grade reductions as described in the project guide.
Failure to submit code that compiles on stu.cs.jmu.edu will result in an automatic grade of 0. In particular, you SHOULD NOT modify the included header files; your code must compile without errors or warnings against the original headers. A significant penalty (up to 25%) will be deducted for compiler warnings.
Caution: No test suite is fully exhaustive, and the test suite distributed with this program is no exception. Be aware that we may test your code with new test cases created after the submission deadline. These test cases will not substantively change the project specification, but they may exercise your program more thoroughly than the current test suite does. You should treat the given test suite as providing your maximum possible base grade, and you should always anticipate how your program may fail to adhere to the project spec in ways that the initial test suite does not test.
Submission
Due: As indicated on Canvas
Please see the project guide for general project help and grading policies. Please refer to the coding standards for coding practice guidelines.
Failure to submit using the “submit” script, and including the source code of ALL previous projects will NOT be accepted and will result in a grade of ZERO.
2021-04-05