SIT232 Object‐Oriented Development
SIT232 Object‐Oriented Development Trimester 1, 2021
Practical Task 3.1
(Pass Task)
Submission deadline: 10:00am Monday, April 12
Discussion deadline: 10:00pm Friday, April 30
General Instructions
This practical task introduces you to arrays and lists that allow you to group, store and manage related data. Arrays are fixed in size and are therefore more time efficient than lists. However, the list is a more flexible data structure that allows you to manage undefined number of records.
1. In this part of the task, you will create a double data type array. The array will have 10 elements and you will individually initialise each of them. After the elements have been initialised, you will print each element to the console.
The way to declare an array is very similar to how we would do this for a variable. We must give it a type using the following format:
typeName[] arrayRefVar;
Here, typeName can refer to any of the primitive data types or a class name, which can be user defined. To construct the array, we must apply the ‘new’ operator as follows:
arrayRefVar = new typeName[length];
The above statement does two things:
- it creates a new typeName data type array of size length;
- it assigns the reference to the newly created array to the reference variable arrayRefVar.
Declaring the array variable, creating the array and assigning the reference to the array to the variable can be combined in one statement as follows:
typeName[] arrayRefVar = new typeName[length];
STEP 1: Start a new C# Console Application project. You may keep the name of the main class as Program, which is the default name. Create a double data type array of 10 elements by adding the following code into the main method of your Program class:

This will declare the array and set the value of each element to zero (i.e., to the default value for double data type).
Each item in an array is called an element and each element is accessed by its numerical index. Remember that numbering always begins at 0. Therefore, to initialize an element within the array, we must use the following syntax:
arrayRefVar[index] = value;
The square brackets are used to refer to the position of each element within the array.
You can now start assigning your own valuesto each element; remember that you cannot have more than 10 elements in myArray. To assign a value to the first element, type the following line of code underneath where you declared the array:

The first element of the array, at position 0, has now been assigned the value 1.0. You now can proceed with the second element by typing the next line of code:

The table provided below outlines what we want your array to contain. You should now individually assign the remaining elements of the array using the values specified in the table. Remember to correctly reference the elements as you progress.
|
index
|
0 | 1 | 2 | 3 | 4 | 5 | 6 | 7 | 8 | 9 |
|
value
|
1.0 | 1.1 | 1.2 | 1.3 | 1.4 | 1.5 | 1.6 | 1.7 | 1.8 | 1.9 |
STEP 2: You will need now to print the elements of the array to the console. Use the following code adding it underneath the last assignment to position 9 in the array:

Repeat the code above for each element in the array. Remember to edit the text within the quotation marks so it is relevant to the element you are printing within that statement.
Compile, run and check the program for potential errors. What happens if you try to assign a value to index 10? Try it and see. As there are only 10 spaces in the array (indexed 0‐9), trying to assign a value to the 11th space will cause an error. This is to be the main error you will be encountering while working with arrays.
2. As you can see, there is a lot of repeated code and it would be much easier to use a loop to iterate through each element of the array rather than accessing them individually. Thistask steps you through using loops to assign values and print them to the console.
STEP 1: Continue with the current project and, within the main method of the Program class, declare an array of integer values that will hold 10 elements.

Write a for loop to populate the array by typing the following code beneath your array declaration:

There are 10 elements in the array, which must be assigned a value. The first element of the array is at index 0; therefore, the iterating variable of the for loop, designated as i, starts at 0. In order to fill all elements of the array, we want the loop to continue until it reaches 9 (i.e., less than 10). We will add 1 to i each time the loop is executed. The value that is being assigned to each element of the array is the current value of i. This loop should produce the following content of the array.
|
index
|
0 | 1 | 2 | 3 | 4 | 5 | 6 | 7 | 8 | 9 |
|
value
|
0 | 1 | 2 | 3 | 4 | 5 | 6 | 7 | 8 | 9 |
STEP 2: You must now create another for loop in order to print out the array. Add the following code beneath the loop you wrote to assign values.

Compile, run and check the program for potential errors.
3. Often the elements of an array represent a series of values that may be used in a calculation for another purpose. For example, if the array represents exam grades for a student, the tutor may wish to total the elements of the array to calculate the average mark attained by that student. This task will step you through coding this.
Continue with the current project and use the information from the table below to create an integer array with 10 elements.
|
index
|
0 | 1 | 2 | 3 | 4 | 5 | 6 | 7 | 8 | 9 |
|
value
|
87 | 68 | 94 | 100 | 83 | 78 | 85 | 91 | 76 | 87 |
When you know the array’s values at the moment of declaration, you can declare, create and assign values in one statement. The syntax is as follows:
typeName[] arrayRefVar = {value1, value2, value3,…,value10};
Add the following code to declare, create and assign the values.
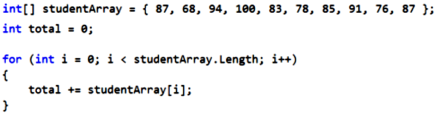
To sum all the values, we need a variable to hold the running total, e.g. total. This needs to be declared outside of the for loop and initialised to zero. If declared inside the loop, then the varible is only accessible inside the loop; but we will need the information stored in the variable outside the loop. Within the for loop we use studentArray.Length which is an inbuilt method of any array that provides its length. It is a better programming practice to use array.Length as we do not need to worry about knowing how many values are actually stored in the array. Finally, we use ‘+=’ operator to say that
total = total + studentArray[i]
Now, let us print out some values of the array, namely the total, the number of elements in the array, and the average mark. To do this, add the following code after the for loop.

Compile, run and check the program for potential errors.
4. Your next task is to utilise arrays to store information that is collected via user input in a survey. This is a typical array‐processing application, where we want to use Console.ReadLine() to accept input from the keyboard and store it in an array.
Continue with the current Console Application project and declare an array based on the information in the following table.
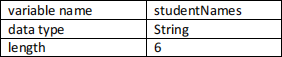
Write a program code requesting the user to enter 6 student names and assign each name to the next element in the declared array. Then use a for loop to print all the entered names. Compile, run and check the program for potential errors.
5. Your next exercise is to write a program to read a sequence of values and add them to an array. You will then find the largest and the smallest values of the array, print them to the screen, and print the content of the array.
Continue with the current project and follow the instructions to implement your program.
- Create a one‐dimensional double data type array of length 10.
- Create a currentSize variable of type int and initialise it to zero.
- Create two variables of type double named currentLargest and currentSmallest.
Using these variables, write code to read input from the console and print the array. Then add code to find the largest value by implementing the following instructions:
- Assign to the variable currentLargest the value stored at the first position in the array.
- Use a for loop to iterate through the array. In the for loop, use an if statement to compare the current element of the array to the value held by the currentLargest variable. If the current element is greater than the currentLargest, assign its value to the currentLargest. In the for loop, print out each element of the array.
- Print the largest value of the array to the console.
Similarly, find the smallest value stored in the array. Compile, run and check the program for potential errors.
6. In this part, we will look at multi‐dimensional arrays and other functions that we can perform on arrays. The simplest form of a multi‐dimensional array is the 2‐dimensional array. The 2‐dimensional array is, in essence, the array of arrays. The easiest way to represent it is a table. The table has x number of rows and y number of columns. The following figure illustrates the 2‐dimensional array with 3 rows and 4 columns. It also shows how to generally access each of the values (or cells).

Assume myArray is a 2‐dimensional array. Then each of its elements can be addressed as
myArray[row,column]
Multidimensional arrays may be initialised by specifying bracketed values for each row. For example,
int[,] myArray = new int[3, 4] { { 1, 2, 3, 4 }, { 1, 1, 1, 1 }, { 2, 2, 2, 2 } };
is the equivalent of the table below.
|
|
Column 1
|
Column 2
|
Column 3
|
Column 4
|
|
Row 0
|
1 | 2 | 3 | 4 |
|
Row 1
|
1 | 1 | 1 | 1 |
|
Row 2
|
2 | 2 | 2 | 2 |
An element in a 2‐dimensional array can be accessed by using the subscripts: the row index and the column index of the array. For example:
int value = myArray[2,3];
This statement will set the variable value to the value located on the second row in the third column.
Continue with the current project and declare the array based on the information from the table above. To step through the multi‐dimensional array, you will need a nested for loop. The first loop will step through each row, while the second loop will do this for each column. Add the following code to print out each element of your array
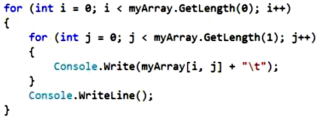
The GetLength() method is used to obtain the length of a specific dimension of the array. Specifically, GetLength(0) will relate to the number of rows and GetLength(1) will return the number of columns in this example.
Compile, run and check the program for potential errors.
7. The .NET Framework has another structure that handles many of the issues associate with arrays a little easier. This is the List, which is commonly referred to as the collection of elements. It is an object, which provides us with the ability to add an item, remove an item (from any location in the List), peek an item, and also move an item from one place in the list to another. These functions are not easily applied to the array, and therefore the List provides more flexibility depending on the data you want to collect. However, if the number of elements in the List is known, or if the List is of a small fixed size, or if the efficiency in using primitive data types is important, it is better to use arrays. In this case, using the List will cause your program to run slower. Similarly to the array, the List collection can be used to hold object references and primitive data types (e.g. double).
Your task is now to create a List to hold an undetermined number of names. Consider setting up a new list of students at the start of the term. You will need all names, but until they arrive you are unsure how many students there will be.
Continue with the current project and declare the List. This process is very similar to declaring any other object. We must tell it what object (i.e., give it a class name) we are creating (i.e., List), provide it with a type (e.g., String), and instantiate the instance of the object using the keyword ‘new’. Declare the List of type String by typing the following code:

In this exercise, we are going to use the Random class to generate a random integer between 1 and 12 to determine the amount of elements we are going to store. To set up the random value, for the number of students in the class, add the following code:

Like for the array, the contents of the List are known as elements. However, unlike for the array, we do not need to know the position or index that an element is being added to. For the List, data is added to the end of it. If we want to add data at a particular position in the List, then we can also achieve this. Therefore, we have two different methods we can use when adding information to the List.
- The Add method adds data to the end of the List; e.g. myList.Add("objectToAdd").
- The Insert method adds data to the List at a specific index. Therefore, we feed the Insert method with the index as well as the data we want to add; e.g. myList.Insert(2,"objectToAdd").
In this example, we will use the Add method. We will use a for loop to add elements to the List until the counter has reached the value of the previously declared variable randomNumber. Implement this via the following code:

You now have successfully declared and initialised your data collection. All elements have also been assigned a value. Your list’s size should have the same value as randomNumber and you can check this using the Count property. Thus, to get how many elements are in an array, we use the Length property, but for a List we need to use the Count.
Use a for loop to print out the contents stored in your List. Compile, run and check the program for potential errors.
8. In the class Program, add FuncOne, a method that accepts an arbitrary integer data type one‐dimensional array as the input. The method must check the size of the array and
- return the number of odd elements, if the number of elements is greater than 10;
- return the total product of even elements, otherwise.
Add an appropriate program code in the main method of the class to check FuncOne for potential errors.
9. In the class Program, add FuncTwo, a method that accepts a double data type List collection as the input. The method must compute the average value across all elements of the list and alter the given list by subtracting the average value from each element of the collection. Note that the return type of the method must be void. Add an appropriate program code in the main method of the class to check FuncTwo for potential errors.
10.In the class Program, add FuncThree, a method that accepts an arbitrary integer data type 2‐dimensional array asthe input. The method must convert the input into a one‐dimensional array by collecting all values that are multiple of 3. It must consider elements column by column, in ascending order, and for every column examine elements in the ascending order of the row index. The method must return the resulting one‐dimensional array. Add an appropriate program code in the main method of the class to check FuncThree for potential errors.
11.In the class Program, add FuncFour, a method that accepts an integer data type one‐dimensional array as the input. The method must iterate through the elements of the array and produce a multiplication table based on the values recorded in the array. The resulting multiplication table returned by the function must be in the form of a two‐dimensional array. For example, the input {1,3,4} must provide the following table

Add an appropriate program code in the main method of the class to check FuncFour for potential errors
Further Notes
- Study the concept of a data collection and how to use it in your programs by reading Section 3.2 of SIT232 Workbook available in CloudDeakin → Learning Resources.
- The following links will give you more insights about arrays, lists, and the way to use them:
● https://docs.microsoft.com/en‐us/dotnet/csharp/programming‐guide/arrays/
● https://docs.microsoft.com/en‐us/dotnet/csharp/programming‐guide/concepts/collections
● https://docs.microsoft.com/en‐us/dotnet/api/system.collections.generic.list‐1
- In this unit, we will use Microsoft Visual Studio 2019 to develop C# programs. Find the instructions to install the community version of Microsoft Visual Studio 2019 available on the SIT232 unit web‐page in CloudDeakin in Learning Resources → Software → Visual Studio Community 2019. You however are free to use another IDE, e.g. Visual Studio Code, if you prefer that.
Submission Instructions and Marking Process
To get your task completed, you must finish the following steps strictly on time.
- Make sure that your programsimplement the required functionality. They must compile and have no runtime errors. Programs causing compilation or runtime errors will not be accepted as a solution. You need to test your programs thoroughly before submission. Think about potential errors where your programs might fail.
- Submit the expected code files as a solution to the task via OnTrack submission system. You must record a short video explaining your work and solution to the task. Upload the video to one of accessible resources and refer to it for the purpose of marking. You must provide a working link to the video to your marking tutor in OnTrack.
- Once your solution is accepted by the tutor, you will be invited to continue its discussion and answer relevant theoretical questions through the Intelligent Discussion Service in OnTrack. Your tutor will record several audio questions. When you click on these, OnTrack will record your response live. You must answer straight away in your own words. As this is a live response, you should ensure you understand the solution to the task you submitted.
Answer all additional questions that your tutor may ask you. Questions will cover the lecture notes; so attending (or watching) the lecturesshould help you with this compulsory discussion part. You should start the discussion as soon as possible asif your answers are wrong, you may have to pass another round,still before the deadline. Use available attempts properly.
Note that we will not accept your solution after the submission deadline and will not discuss it after the discussion deadline. If you fail one of the deadlines, you fail the task and this reduces the chance to pass the unit. Unless extended for all students, the deadlines are strict to guarantee smooth and on‐time work throughout the unit.
Remember that this is your responsibility to keep track of your progress in the unit that includes checking which tasks have been marked as completed in the OnTrack system by your marking tutor, and which are still to be finalised. When marking you at the end of the unit, we will solely rely on the records of the OnTrack system and feedback provided by your tutor about your overall progress and the quality of your solutions.
2021-04-02