HW 6 | Appointment Reservation System
Hello, dear friend, you can consult us at any time if you have any questions, add WeChat: daixieit
HW 6 | Appointment Reservation System
Objectives: To gain experience with database application development, and learn how to use SQL from within Python via pymssql.
A common type of application that connects to a database is a reservation system, where users schedule time slots for some centralized resource. In this assignment you will program part of an appointment scheduler for vaccinations, where the users are patients and caregivers keeping track of vaccine stock and appointments.
This application will run on the command line terminal, and connect to a database server you create with your Microsoft Azure account.
You will have two main tasks:
● Complete the design of the database schema with an E/R diagram and create table statements
● Implement the code that stores Patient information, and lets users interactively schedule their vaccine appointments. We have implemented the code that caregivers use to manage the appointment slots and inventory, which will be a useful reference for you. The implementation is broken up into two milestones, part 1 and part 2, described below.
Be Careful: This homework requires writing a non-trivial amount of code; our solution is about 600 lines, including the starter code. It will take SIGNIFICANTLY more time than your previous assignments. We will show you the setup process and coding methods in section and lecture. It is critical that you follow along.
*Make sure to finish this part of the assignment and upload your setup verification of step 2.4 for the first 5 points!*
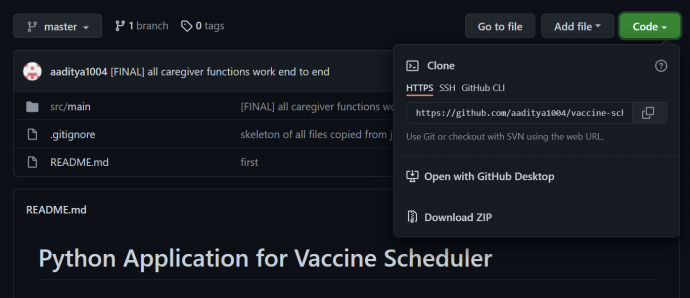
2.1 Clone the starter code
1. Navigate to the Github repository hosting the starter code:
https://github.com/aaditya1004/vaccine-scheduler-python
2. Click on the green button “Code” and select “Download ZIP” from the drop-down menu.
3. Once your download completes, decompress the ZIP file and retrieve the starter code.
2.2 Read through the starter code
We created the important folders and files you will be using to build your application:
● src.main.scheduler/
Scheduler.py:
This is the main entry point to the command-line interface application. Once you compile and run Scheduler.py, you should be able to interact with the application.
This is a folder holding all of the important components related to your
database.
ConnectionManager.py: This is a wrapper class for connecting to the
database. Read more in 2.3.4.
model/:
■ This is a folder holding all the class files for your data model.
■ You should implement all classes for your data model (e.g., patients, caregivers) in this folder. We have created implementations for Caregiver and Vaccines, and you need to complete the Patient class (which can heavily borrow from Caregiver. Feel free to define more classes or change our implementation if you want!
● src.main.resources/
○ create.sql: SQL create statements for your tables, we have included the create table code for our implementation. You should copy, paste, and run the code (along with all other create table statements) in your Azure Query Editor.
2.3 Configure your database connection
2.3.1 Installing dependencies
Our application relies on a few dependencies and external packages. You’ll need to install those dependencies to complete this assignment.
We will be using Python SQL Driver pymssql to allow our Python application to connect to an Azure database. We also do not have a requirement on what python package managers you can use, but we recommend you use either Anaconda or pip
Libraries are difficult to work with, especially when you have different machines with different OS. So we are going to be specifying recommendations for this assignment. We suggest you follow the same, to have a bug free experience. The point of this assignment is not debugging but learning database applications.
With that being said, We suggest:
1) Windows + Pycharm:
a) For windows users, follow the setup guide below to setup the application and dependency carefully. After much experimentation, we have found this combination to be a great coding experience
2) Mac/Linux + Terminal + Any Text Editor of your choice:
a) As a mac user, I was never really a big fan of developing applications using pycharm. Bulk of this reason is compatibility with ever changing OS versions. So what we recommend is this, develop code in any text editor for your
choice(IDE/NO-IDE. Ex: Pycharm, VS-CODE). But we will run our application using the mac/linux terminal. To download dependencies, use pip as your package manager, run pip3 install -r requirements.txt and then finally cd to the directory with Scheduler.py and then run python3 Scheduler.py to run the application. Use your terminal to set the environment variables too (see below)
For additional help, you can follow this link here. The instructions for Windows, Linux and Mac are distinct on the given link.
Note: You may already have some of the requirements (such as pip package manager or Homebrew for Mac) and do not need to go over the installation of these again.
Windows users!! Once you go to the link, make sure to read STEP 2 for Windows carefully.
2.3.2 Setting up IDE
Note: You may use any IDE, but please make sure it works before turning in your assignment! We will be providing support for PyCharm (community edition is free) and VS Code but python setup should be similar for all of them.
PyCharm ComThe following setup is for PyCharm:
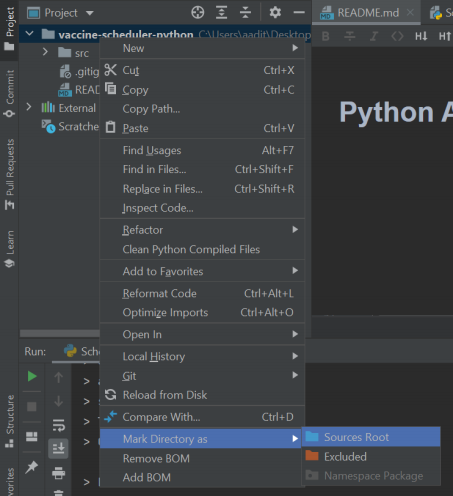
1. Open your cloned directory using your PyCharm so that your vaccine-scheduler-python is the root directory
2. You will also need to mark vaccine-scheduler-python as the source root by right-clicking on the folder in PyCharm and selecting “Mark Directory As” -> “Sources Root” .
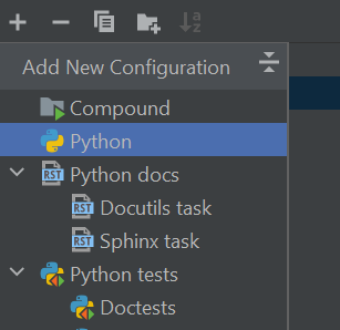
3. Now Add Configuration
a. Select the Add Configuration option.

b. Select “Add new Configuration” .

‘Working directory’ should be pointing to the vaccine-scheduler-python directory.
Click on the page icon on the right-end of ‘Environment Variables’ to open the following dialog box and ensure ‘Include system environment variables’ is checked!
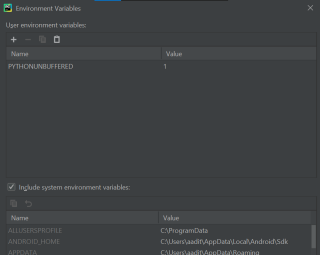
Click OKAY to confirm all changes and create the configuration.
2.3.3 Setting up credentials
The first step is to retrieve the information to connect to your Microsoft Azure Database.
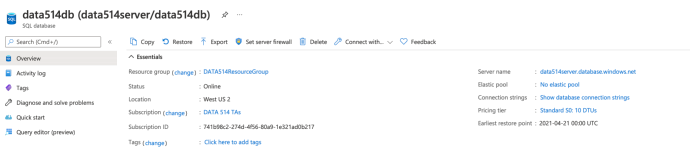
● The Server and DB names can be found in the Azure portal.
● The server name would be “data514server.database.windows.net” and the
database name would be “data514db” for the database shown in the screenshot
below.
YOU NEED TO CHANGE THIS ACCORDING TO YOUR DATABASE!
● The User ID would be of the format <user id>@<server name>
For example, it could be exampleUser@data514server where “exampleUser” is the login ID which you used to log in to query editor on Azure and “data514server” is the server name.
● Password is what you used to log in to your query editor on the Azure portal. If you’re having trouble finding that information, please make a discussion post, or contact us through email!
Once you’ve retrieved the credentials needed, you can set up your environment variables.
2.3.3a Setting up environment variables - MAC USERS ONLY
Make sure to set this in the correct environment if you’re using virtual environments!
Open your terminal and type:

Where “{}” is replaced by the respective information you retrieved from step 1.
Do note that those environment variables are only added for the current session. If you’d like to add those environment variables permanently, copy the exports and paste them into “ .bash_profile” .
2.3.3b Setting up environment variables - WINDOWS USERS ONLY
Make sure to set this in the correct environment if you’re using virtual environments!
Open a command prompt and type:

Where each “x” is replaced by the respective information you retrieved from step 1.
These environment variables will be saved permanently, and a “SUCCESS: Specified value was saved.” should be returned for each variable saved. To see these changes, close the command prompt and open a new command prompt, and type:

This will return a list of your environment variables, and you should be able to see your new variables within this list.
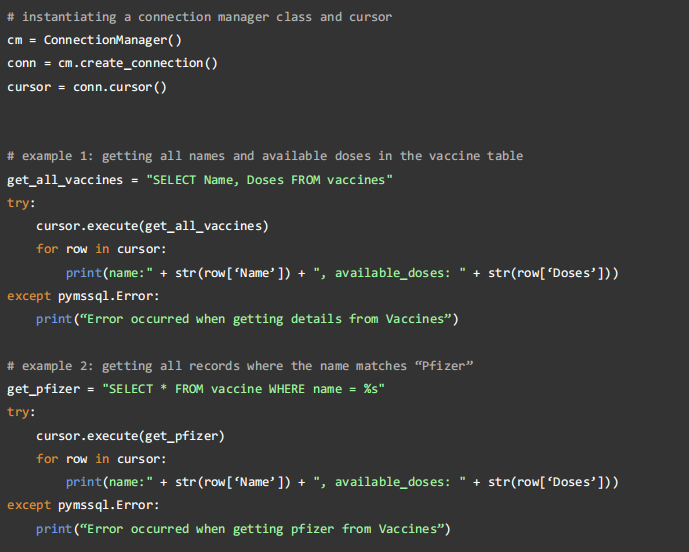
2.3.4 Working with the connection manager
In scheduler.db.ConnectionManager.py, we have defined a wrapper class to help you instantiate the connection to your SQL Server database. We recommend reading about pymssql Connection and Cursor classes for retrieving and updating information in your database. Here’s an example of using ConnectionManager.
Helpful resources on writing pymssql:
2.4 Verify your setup
Once you’re done with everything, try to run the program and you should see the following output:
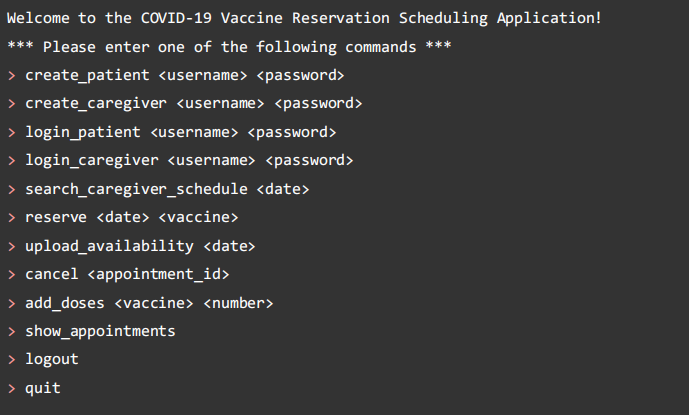
To verify you have done the setup, take a screenshot or phone picture of this screen on your computer, and upload to gradescope for 5 points.
Some of these operations will not work! It is your job in the rest of the assignment to finish implementing the entire system.
Requirements
Your assignment is to build a vaccine scheduling application (with a database hosted on
Microsoft Azure) that can be deployed by hospitals or clinics and supports interaction with users through the terminal/command-line interface. In the real world it is unlikely that users would be using the command line terminal instead of a GUI, but all of the application logic would remain the same. For simplicity of programming, we use the command line terminal as our user interface for this assignment.
We need the following entity sets in our database schema design (hint: you should probably be defining your class files based on this!):
● Patients: these are customers that want to receive the vaccine.
● Caregivers: these are employees of the health organization administering the vaccines.
● Vaccines: these are vaccine doses in the health organization’s inventory of medical
supplies that are on hand and ready to be given to the patients.
In this assignment, you will need to:
● Complete the design of the database schema, with an E/R diagram and table statements (Part 1);
● Implement the missing functionality from the application (Part 1 & Part 2)
A few things to note:
● You should handle invalid inputs gracefully. For example, if the user types a command that doesn’t exist, it is bad to immediately terminate the program. A better design would be to give the user some feedback and allow them to re-type the command. Points will be taken off if the program terminates immediately after receiving invalid input. While you don’t have to consider all possible inputs, error handling for common errors (e.g., missing information, wrong spelling) should be considered.
● After executing a command, you should re-route the program to display the list of commands again. For example:
○ If a patient ‘reserves’ their vaccine for a date, you should update your database to reflect this information and route the patient back to the menu again.
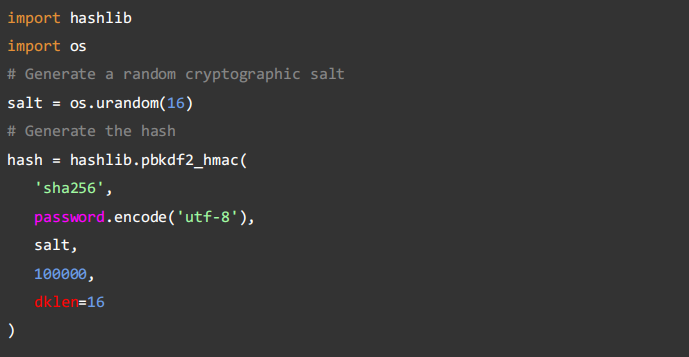
1.3 How to handle passwords
You should never directly store any password in the database. Instead, we'll be using a technique called salting and hashing. In cryptography, salting hashes refer to adding random data to the input of a hash function to guarantee a unique output. We will store the salted password hash and the salt itself to avoid storing passwords in plain text. Use the following code snippet as a template for computing the hash given a password string:
Design
You will first need to work on the design of your database application. Before you begin, please carefully read the assignment specification (including part 2) and the starter code, and think about what tables would be required to support the required operations. Once you have an idea of how you want to design your database schema:
● Draw the ER diagram of your design and place it under src.main.resources (design.pdf).
● Write the create table statements for your design, create the tables on Azure, and save the code under src.main.resources (create.sql).
You will also need to implement the corresponding Python classes of your design. We have implemented Caregiver.py for you, but feel free to change any of the details. You will need the following classes, and you may implement more data models if you feel the necessity:
● Caregiver.java: data model for caregivers (implemented for you.)
● Vaccine.java: data model for vaccines (implemented for you.)
● Patient.java: data model for patients.
○ You will implement this class, it can be mostly based on Caregiver.java
Implementation
Congratulations! You’re now ready to implement your design! For part 1, you will need to implement the following functionalities. It is up to you to decide how you want the user to interact with your system. TAs will be interacting with your command-line interface, and we will give credits to all reasonable designs, so don’t worry too much about the details.
We have implemented account creation for caregivers as an example for you, please read through our implementation before you begin.
You’re allowed to choose your own messages to display, but please make sure to supply enough information to the user regarding specific situations (e.g., when create failed). Refer to our implementation as an example.
You will need to implement the following operations:
● create_patient <username> <password>
● login_patient <username> <password>
○ If a user is already logged in in the current session, you need to logout first before logging in again.
Deliverables for Part 1
Note for Autumn 2021 quarter: Because of the Thanksgiving holiday, we don’t want to pressure you on any particular due date for Part 1. Complete part 1 on the way to part 2, but make sure you have finished part 1 roughly around Nov. 24 or you will be significantly behind on the homework.
You are free to define any additional files, but part 1 should require the following at least the following:
● src.main.resources
○ design.pdf: the design of your database schema.
○ create.sql: the create statement for your tables.
● src.main.scheduler.model
○ Caregiver.py: the data model for your caregivers.
○ Patient.py: the data model for your users.
○ Vaccine.py: the data model for vaccines.
○ Any other data models you have created.
● src.main.scheduler
○ Scheduler.py: the main runner for your command-line interface.
You will implement the rest of your application in part 2.
For most of the operations mentioned below, Your program will need to do some checks to ensure that the appointment can be reserved (e.g., whether the vaccine still has available doses). Again, you do not have to cover all of the unexpected situations, but we do require you to have a reasonable amount of checks (especially the easy ones).
For part 2, you will need to implement the following operations:
● search_caregiver_schedule <date>
○ Both patients and caregivers can perform this operation.
○ Output the username for the caregivers that are available for the date, along with the number of available doses left for each vaccine.
● reserve <date> <vaccine>
○ Patients perform this operation to reserve an appointment.
○ You will be randomly assigned a caregiver for the reservation on that date.
○ Output the assigned caregiver and the appointment ID for the reservation.
● show_appointments
○ Output the scheduled appointments for the current user (both patients and caregivers).
○ For caregivers, you should print the appointment ID, vaccine name, date, and patient name.
○ For patients, you should print the appointment ID, vaccine name, date, and caregiver name.
● Logout
Deliverables for Part 2
When you’re finished, please turn in the entire repository by compressing the project folder into a zip file, then uploading it on Gradescope.
We will test your solutions by downloading your repo from gradescope and running the application on our machines. Your grade for this homework will be worth 100 points, divided as:
● Setup (5 points)
○ Finish setup through step 2.4 and upload your verification to gradescope
● Part 1 (50 points)
○ Design (30 points)
Your database design including the files design.pdf and create.sql ○ Implementation (20 points)
Your working implementation of the part 1 functions:
create_patient, login_patient
● Part 2 (45 points)
○ Implementation (45 points)
The remainder of the functions for Patient: search_caregiver_schedule, reserve, show_appointments, logout
Additionally, you may receive up to 10 points of extra credit for implementing one of the options below
Optional Extra credit
You can do either one of the following extra tasks by the final due date for 10 extra credit points.
1. Add guidelines for strong passwords. In general, it is advisable that all passwords used to access any system should be strong. Add the following check to only allow strong passwords:
a. At least 8 characters.
b. A mixture of both uppercase and lowercase letters.
c. A mixture of letters and numbers.
d. Inclusion of at least one special character, from “!” , “@” , “#” , “?” .
2. Both caregivers and patients should be able to cancel an existing appointment. Implement the cancel operation for both caregivers and patients. Hint: both the patient’s schedule and the caregiver’s schedule should reflect the change when an appointment is canceled.

2021-12-01