ECE 0301: Programming Problem 2
Hello, dear friend, you can consult us at any time if you have any questions, add WeChat: daixieit
ECE 0301: ECE Problem Solving With C++
ECE 0301: Programming Problem 2
DUE SUNDAY JANUARY 21, 11:59 PM
LATE SUBMISSION WITH 30% PENALTY BY TUESDAY 11:59 PM FOLLOWING THE DUE DATE
Follow the steps below to create a program that uses Ohm’s law to calculate current given user- specified values of voltage and resistance:
1. Download the starter code from Canvas for problem02
2. Open VSCode and choose “File” > “Open Folder” and navigate into the problem02 folder (the same location as the CMakeLists.txt) and click “Open”/ “Select Folder” .
3. Open problem02.cpp in the VSCode editor, and create a program that defines the
following values for resistance (R) and voltage (V). We’re using R and V to indicate the values, however it is recommended that you do not use these single-letter variables in your program:
R = 1 kΩ = 1000 Ω
V = 5 V
Use Ohm’s law to calculate the current (I = V/R), and output the current value to stdout in the format shown below:
If R = 1000 Ohms and V = 5 Volts, then I = 0.005 Amps
4. Test your program by running it in debug mode in VSCode. Similar to the first programming problem, follow the steps below:
a. With your .cpp file open in the VSCode editor, open the command palette
(Ctrl+Shift+P) and run CMake: Configure. If prompted to select a kit choose the same as you did for the first programming problem, and if prompted to select a variant choose “Debug” .
b. Open the Command Palette again (Ctrl-Shift-P) and select CMake: Build. Check for build errors in the Problems tab.
i. Note that there is a bonus option for this problem, so when you run a build you may be prompted to choose the build target. Choose problem02 for now.
c. Open the Command Palette again (Ctrl-Shift-P) and select CMake: Debug to run your program in debug mode.
d. As you make edits to your program and you want to re-run it, just run CMake:
Debug again. You do not need to re-run CMake: Configure every time, only when you first open a folder in VSCode, and CMake: Debug runs a build automatically before debugging if anything in the project has changed.
5. Test your Ohm’s law calculation by changing the value of the voltage variable and
confirm that your current output is what you expect. Test at least the following values: 1 V, 2 V, 100 V
6. Modify your program to take user input of the voltage value using cin. Keep your
resistance value fixed at 1 kΩ, and prompt the user to input a voltage with the prompt “Enter voltage:” . Your program should still calculate and output the current, now using the user-specified voltage.
7. Follow the instructions below to test your program with user input:
a. You previously practiced running an executable from the terminal, for example: ./problem02
When running a program from the Terminal that takes input with cin, you can enter inputs via the Terminal. This is a fine way to test, but again it is useful to be able to run debugging as programs get more complex, as described next.
b. To allow user input when running CMake: Debug in VSCode, we need to set up some configuration parameters. To do this, we’ll create a launch.json file, which allows us to configure parameters on “ launch” (running our executable). Follow the steps below to set up your launch file:
i. Ensure you have opened your problem02 folder using “Open Folder” in VSCode, and that you have the problem02.cpp file open in the VSCode editor
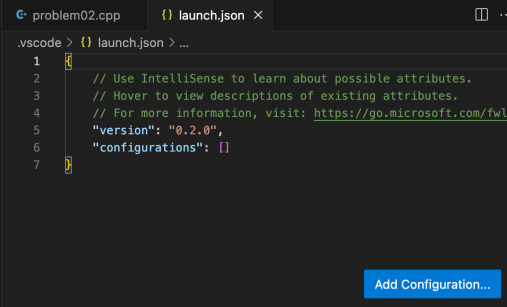
ii. Click on the Debug icon in the left sidebar, and then click “create a launch.json file” below the Run and Debug button:

If a menu appears prompting you to select from options for the
launch.json file and C++ is not listed, ensure that you first have the .cpp file open in the editor, and then try again clicking “create a launch.json file” .
iii. When the launch.json file opens in the editor, click “Add Configuration …” in the bottom right and select C/C++ launch
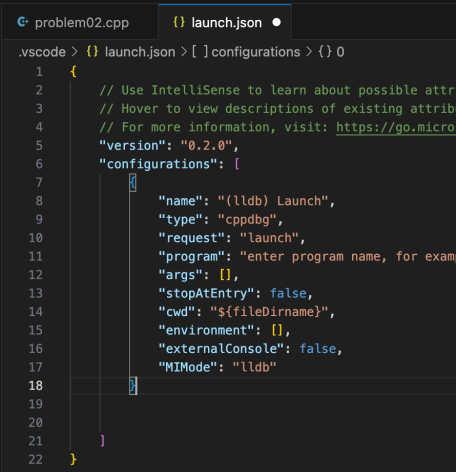
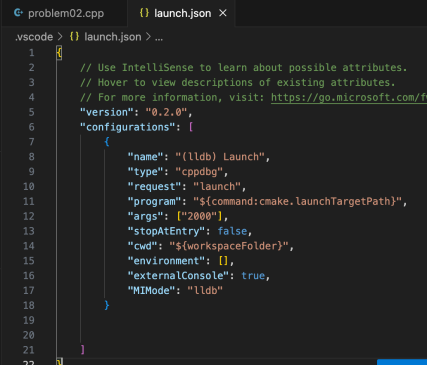
iv. Your launch file should now look similar to the following. Although it may be slightly different depending on your operating system, the important parts for now are the “program”, “cwd”, and “externalConsole”:
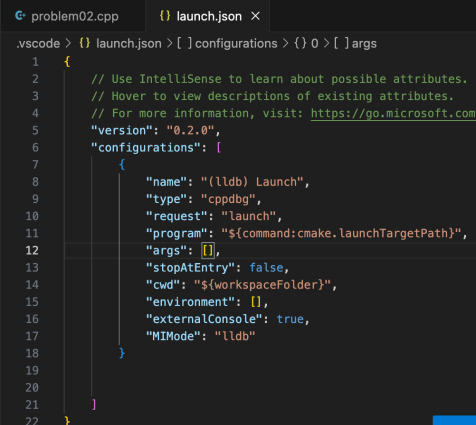
v. Edit the string next to program to read
"${command:cmake.launchTargetPath}"
This will ensure that the program is built and run using CMake, similar to running CMake: Debug.
vi. Edit the string next to “cwd” to read "${workspaceFolder}"
vii. To enable using a terminal for user input, change the Boolean for “externalConsole” to true.
viii. Save your launch.json file, then run and debug your program by clicking the green play button “Start Debugging” that appears next to the launch task at the top of the left sidebar:
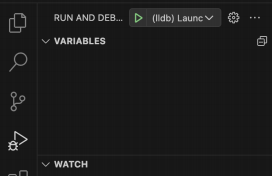
ix. IMPORTANT: When using a launch file, you should always debug using the “Start Debugging” button instead of running CMake: Debug.
x. Now when you run debugging, an external console will appear where you can enter user input. Close the terminal once your program exits.
8. Use debugging with your launch file to test that your current output is correct for various values of user-input voltage.
9. Modify your program to take an optional command-line input (CLI) argument when running the executable. Keep the default resistance value from before if no resistance input is provided. Your program should still prompt the user for the input voltage using cin as before, but now it should use the user-specified resistance as well, if a resistance input is provided. Recall that the stof function can be used to convert string arguments to floating point type, and reference textbook section 10.5 for additional examples. Instructions below provide more information on using and testing command-line inputs.
a. Again, we could run our executable from the terminal, and provide command- line input (CLI) arguments as a space-separated list of arguments following the executable name:
./problem02 2000
The example above should be interpreted by your program as one argument “2000” that is provided upon “ launching” (starting) the executable.
b. Recall that writing your main function as:
int main(int argc, char *argv[])
allows arguments input from the command line, and the first argument 2000 in the above example can be accessed within your program as argv[1].
c. Instead of running the executable from the Terminal, how can we providearguments when debugging our executable in VSCode? Again, we’ll use our launch.json file! Open the launch.json file that you created earlier (it is saved under .vscode in your project folder). Edit the “args” to include your resistance value, for example “2000”:
d. Run your program with the “Start Debugging” button as before, and now the args will act as command-line inputs to your program (accessible in argv).
e. Test that your program uses the command-line argument as the resistance value, if an argument is provided. Test by changing or removing the argument in the launch.json and running your program, and confirming the calculated current is what you expect.
f. Note that you will get an error if you provide arguments but have not modified your main function to take arguments! Remember:
int main(int argc, char *argv[])
10. Add validation for the user input: For example, voltage and resistance values must be positive. If either the voltage or the resistance input is invalid, the program should print a message as specified below, and return EXIT_FAILURE without calculating a current.
For example, you program should reject the resistance or voltage input “-1000” . Assume that the inputs will be numerical (that is, you do not have to check the input for alphabetical characters). Note also that you should avoid division by zero.
a. If resistance input is negative, output should read:
Invalid resistance, must be positive.
b. If voltage input is negative, output should read:
Invalid voltage, must be positive.
11. BONUS (3 pts): Create another version of your program in the file
problem02_bonus.cpp, to allow continuous input of voltage values while the program is running, until the user enters a voltage of 0 to quit. In this case, if the resistance input is invalid, the program should still exit with EXIT_FAILURE, but if a voltage input is invalid the program should not exit, instead it should print the message to the user “Invalid voltage, must be positive.” and then prompt again for an input voltage. Again you can assume that the inputs will be numerical (that is, you do not have to check the input for alphabetical characters).
a. To debug this file in VSCode, you will need to set the debug target to problem02_bonus instead of problem02. To do this, open the command palette and run CMake: Set Debug Target and select problem02_bonus. Also open the command palette and run CMake: Set Build Target and ensure that it is set to “all”. Then run CMake: Debug and confirm that it is running problem02_bonus instead of problem02.
Files to submit:
1. problem02.cpp
2. (optional) problem02_bonus.cpp
a. If submitting the bonus make sure that you also submit your problem02.cpp file with each submission attempt.
2024-01-20