CS006: Lab 1 Introduction to HTML and Cloud9 IDE
Hello, dear friend, you can consult us at any time if you have any questions, add WeChat: daixieit
CS006: Lab 1
Introduction to HTML and Cloud9 IDE
In lab 1 students will obtain a cloud-based AWS account to be used for lab work in the course.
Then HTML and basic HTML web page structure is introduced. Students will complete in Cloud9 an initial web page that makes use of fundamental HTML elements, namely, such headings, paragraphs, unordered and ordered lists, hyperlinks, and images. Students will develop (implement and test) their code in the browser-based application Cloud9, an Integrated Development Environment (IDE) included as a service in AWS. At the completion of the lab, students will submit their working code in a single compressed archive file (zip file) on Canvas.
Pre-Lab: AWS Account, Google Chrome
● Before you begin - Complete the following two tasks.
○ Sign-up for an Amazon Web Services (AWS) account.
○ Download and install the Google Chrome web browser.
● AWS Account - Complete sign-up instructions in AWS-Account-Setup_win24.pdf, which is located in the lab 1 Google drive folder (same as this document).
○ Each student will create a new account for use in the course for the current quarter only.
○ Your AWS account is provided free of additional charge for your use this quarter.
○ Do not use your personal Amazon account during this process, or at any time for course work this quarter. This is to protect you from incurring
any additional costs.
○ Your AWS account will be deleted after fi nal exam, so if you want to keep your code long term, make sure you download and then store
code on a local device or a cloud-based storage service such as Google Drive.
○ Carefully complete all steps in the slides in order.
○ Read each instruction in its entirety before proceeding with the process.
○ Accounts from previous quarters for CS006/CS008 cannot be reused.
● Google Chrome -
○ Download and install: https://www.google.com/chrome/ .
○ Chrome is required for all labs in CS006.
○ All grading will occur in a Chrome web browser.
○ All web page examples are displayed in a Chrome web browser.
Cloud9 IDE (an AWS service)
Students will complete all labs for the course in their AWS (Amazon Web Services) account using the Cloud9 IDE (Integrated Development Environment). Cloud9 IDE combines the following functionality in a single web page interface.
● file explorer - create and manage student lab folders and files
● text editor - edit source code
● web page previewer - view code displayed in a web page
● image editor - resize, crop, rotate, or flip image files
1.1 Create lab 1 folder
1. Login to your AWS account: Use Google Chrome only.
https://959097940486.signin.aws.amazon.com/console
Be sure to type Cloud9 in the search window in AWS, then click on Cloud9.
2. Open Cloud9 in AWS. Locate your home folder:
● The home folder (aka root directory) name has the same name as the AWS environment you created when signing up for AWS.
● The home folder’s name consists of cs006_win24_ (lowercase c, lowercase s,
zero, zero, 6, underscore, lowercase w, lowercase i, lowercase n, 2, 3, underscore) then your Net ID in all lowercase (no spaces in between).
● For example, if your Net ID was kflynn001, then the environment name will be cs006_win24_kflynn001.
● All of your individual lab folders will be created inside of your home folder.
● We will use a slightly different folder naming convention for the lab 1 folder we will create in the next step.
3. Create a New Folder - Select your home folder. On Windows fi rst right-click, for a Mac press and hold down two fi ngers on the trackpad, until a drop down menu opens. From the menu click on New Folder. A new folder will be created inside of your home folder (environment).
4. Rename New Folder - Select the New Folder (same way as previous step). From the menu click on Rename. This will highlight the folder’s name. Rename the new folder as follows. Your lab 1 folder name should be your Net ID followed by an underscore ‘_’ followed by
lab1 followed by an underscore ‘_’ followed by your lecture section number in the format section001, section002, or section003. Below are meeting times for all sections.
|
Section Number |
Days & Time |
|
001 |
MWF 8:00-8:50 AM |
|
002 |
MWF 10:00-10:50 AM |
|
003 |
MWF 12:00-12:50 PM |
Example - If your Net ID was klynn001 then your lab 1 folder name would be one of the following based on your lecture section.
kflynn001_lab1_section001, kflynn001_lab1_section002, or
kflynn001_lab1_section003.
1. Download - lab1.html and me.html to your computer. These files are located inside the same lab 1 Google drive folder as this document.
2. Upload - lab1.html and me.html to AWS Cloud9. Right-click on the lab 1 folder that you created earlier in Cloud9 (upper left corner of page), example folder name:
kflynn001_lab1_section001.
With the folder name selected (highlighted), click on the file menu above your home
folder: File->Upload Local File. In the menu (Upload Files) that opens select both files
from your computer then open. If successful, both files will now be imported into your lab 1 folder in Cloud9.
1.2 Static versus Dynamic Web pages
Static websites consist of HTML files with content that does not change over time and display the same information for every visitor. Static web page implementations derive most of their behavior and appearance from frontend web languages HTML and CSS. This course focuses on the creation of static web pages as a straightforward first best for beginners.
In contrast, dynamic websites are generated by backend program scripting languages like PHP and server side web-application frameworks like ASP, where each page is generated by the application in realtime. Dynamic sites access new content and data to customize web pages for individual users based on changing data in realtime. Examples of dynamic web pages are: blogs, e-commerce sites and web page-based calendar apps.
Dynamic Web Page
Imagine you’ re shopping at Amazon.com. When you add an item to your cart, you can go to your checkout page and see the item you added. That checkout page is produced by Amazon’s
servers specifically for you and your current purchase. If you add another item to your cart, an Amazon server instantly makes another web page updated with the new content. You, as a user of the website, actually play a role in what you see. This is an example of a dynamic web page.
Static Web Page
The link below is Google co-founder Sergey Brin’s graduate student web page from Stanford
University in Palo Alto, CA. Click on the link to see exactly what it appeared like in 1998. It has not changed in the interim since Brin and fellow graduate student Larry Page, coauthor for Google’s PageRank algorithm, left Stanford to form Google, Inc. It was coded once and users, over time,
view the same web page rendered in a browser window. If the author wants to change the content, they must edit the web page directly. http://infolab.stanford.edu/~sergey/.
1.3 HTML
Web pages are written in a textual language called HTML (Hypertext Markup Language). Web pages written in hypertext include hyperlinks embedded within the web page that when followed from a web browser allow the user to jump from one web page to the next. The combination of HTML web pages, connected by hyperlinks, and internet protocols for data transmission form the basis for the World Wide Web (WWW).
A markup language encodes the content and structure of a document by marking up or tagging different items (elements) in the document. We will begin our study of web page development with the basic structure of a typical HTML file. An HTML file consists of text and has a filename that ends with the extension .html, for example: index.html.
CS6 uses the current version of HTML5 (HTML 5.2) published by the World Wide Web Consortium (W3C) in 2017. Founded in 1994 at MIT by current director and World Wide Web inventor, Tim Berners-Lee, W3C has served as the primary international standards organization responsible for the development, approval, and adoption of protocols and guidelines for the WWW.World Wide Web since 1994 when it was founded at MIT by the current Tim-Berners Lee.
Structure of an HTML Document
Below is a screenshot of lab1.html. Visually inspect the file below. Then read about each of the sections and elements that make up this file.
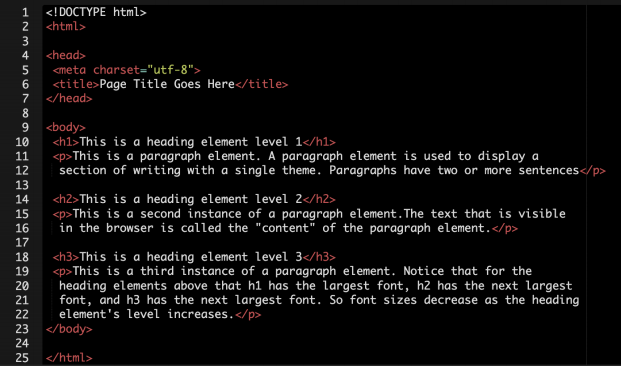
lab1.html - HTML elements in source code above are defi ned below.
● Document Type Declaration (line 1) - an instruction to the web browser indicating what version and type of markup language is contained in an HTML document.
<!DOCTYPE html> indicates that the document is written in HTML5.
● HTML Element - The <html> tag marks the beginning of the HTML document.
● Head Element - The <head> tag marks the document head. Contains information that describes the web page document.
● Title Element - In the head is the mandatory title element. According to the HTML
specification, every document must contain a descriptive title. The <title> tag marks the web page title.The content of this element appears in the browser title bar or browser tab.
● Meta Element - The <meta> tag provides metadata information about the document.
● Body Element - The <body> tag indicates the document body. Contains text and
elements that display in the web page. Information contained inside the body element will be rendered in the browser window aka browser viewport.
● HTML comment - has the form <!-- Comments -->, where a descriptive, "Comments" in this
example, is a note to the reader of the source code. Comments are enclosed in"<!--" and "-->". Comments are not displayed in a browser window, even if included in body element
● Opening/Closing tags - and opening tag, e.g. <p> marks the beginning of an HTML element. Most HTML elements also include a closing tag, e.g. </p> where the element name is
preceded by a forward slash. The closing tag marks the end of an HTML element.
1.4 Explore First Web Page
1. Double-click on the lab1.html file that you earlier uploaded to your lab 1 folder on Cloud9. The file will open in the text editor in Cloud9. The file is HTML source code. You can edit and save it directly in the text editor.
2. Right-click on lab1.html and select Preview from the drop down menu. This will open
lab1.html in preview mode. Preview mode displays the HTML file as it appears in a browser window.
3. Drag the Preview window (by its tab) next to the text editor window, to allow for side-by-side comparison of HTML source code (left) and browser view of webpage on right.
4. Go to the following web page and read the following sections: HTML Documents, HTML Headings, and HTML Paragraphs. https://www.w3schools.com/html/html_basic.asp
You should be able to answer the following questions about lab1.html.
○ What is the basic structure of an HTML file?
○ What are the elements present in all HTML files?
○ What HTML elements are used in the lab1.html file above?
○ What function or purpose do each of these elements serve?
1.5 Personalized Web Page
Headings, paragraphs, lists
1. Double-click on the me.html file that you earlier uploaded to your lab 1 folder on Cloud9. The file will open in the text editor in Cloud9.
2. Right-click on me.html and select Preview from the drop down menu. This will open
me.html in preview mode. The webpage should currently only display This is a heading element level 1.
3. In me.html (open in text editor) replace the content (...) of the <title>...</title> element (at
line 6 in me.html) with your full name: Firstname Lastname. Kevin Flynn used below as an example.
○ before: <title>Page Title Goes Here</title>
○ after: <title>Kevin Flynn</title>
4. Replace the content (...) of the <h1>...</h1> element to match the title element’s content:
Firstname Lastname.
○ before: <h1>This is a heading element level 1</h1>
○ after: <h1>Kevin Flynn</h1>
5. In me.html, add an <h2>...</h2> element with content CS006 Lab 1 after the closing tag of the <h1>...</h1> element from the previous step. After this step, the code should look like the following, but with your name.
<h1>Kevin Flynn</h1>
<h2>CS006 Lab 1</h2>
6. In me.html, add an <h3>...</h3> element with content Bucket List after the closing tag of the <h2>...</h2> element from the previous step.
<h3>Bucket List</h3>
7. In me.html, add an <h3>...</h3> element with content Goals after the closing tag of the <h3>Bucket List</h3> element from the previous step. The next tag after the closing tag </h3> for this step should be the closing tag </body>.
<h3>Goals</h3>
</body>
8. Save me.html and Preview file. You can save me.html by placing the cursor inside of me.html and pressing ctrl-s (Windows) or command-s (Mac) on the keyboard. For other saving options, use the File menu.
9. Add a paragraph element <p>...</p> after the closing tag of the <h3>Bucket List</h3> and before the opening tag for <h3>Goals</h3>. In the paragraph’s content describe why you chose each of the five items. Where and when did you get the idea for each? This
paragraph is not displayed in the sample solution.
10. Add a paragraph element <p>...</p> after the closing tag of the element <h3>Goals</h3>. In the paragraph’s content describe why you chose each of the five items. Where and
when did you get the idea for each? Are your goals modest or ambitious? What is your
dream goal? What would you pursue if money and time were no object. This paragraph is not displayed in the sample solution.
11. Go to the following web page and read the following section: HTML Lists.
https://www.w3schools.com/html/html_lists.asp
12. Goals: In an ordered list element <ol>...</ol>, add your top 5 goals as individual list item elements <li> …</li>. Be specific. The list should be ordered by importance. The lower the number in the list, the higher the goal’s position in the list and relative importance. Your dream goal is number 1. Place this entire <ol>...</ol> element after the closing tag for the <p>...</p> element that follows <h3>Goals</h3>.
<h3>Goals</h3>
<p>......</p>
<ol>
<li>Goal #1</li>
<li>Goal #2</li>
<li>Goal #3</li>
<li>Goal #4</li>
<li>Goal #5</li>
</ol>
13. Bucket List: In an unordered list element <ul>...</ul>, add 5 bucket list items as individual list item elements <li> …</li>. The list is not ordered by importance or timeline. Place this list after the closing tag for the <p>...</p> element that follows <h3>Bucket List</h3>. The closing tag for the <ul> …</ul> element will occur before the opening tag of the
<h3>Goals</h3> element.
<h3>Bucket List</h3>
<p>......</p>
<ul>
<li>Bucket list #1</li>
<li>Bucket list #2</li>
<li>Bucket list #3</li>
<li>Bucket list #4</li>
<li>Bucket list #5</li>
</ul>
Images
1. Go to the following web page and read the following section: HTML Images. 。 https://www.w3schools.com/html/html_images.asp
2. Upload an image file of yourself (.jpg. .jpeg or .png) to the same folder as lab1.html and
me.html, on AWS. From the menu bar, select File->Upload Local Files to select an image from your computer to upload to AWS. NOTE: You should resize your image before you upload it for use in your web page.
3. Place an image element at the top of the webpage that uses your image file after
<h1>...</h1> and before <h2>CS006 Lab 1</h2>. The format for an image in HTML is below.
<img src="me.jpg" alt="My picture" width="400" height="300">
You are required to provide values for the file name of your image, alternate text and the width and height of the image in the <img> code above
4. Resize your image so that it appears in relatively the same proportion (width and height) on the web page as the sample solution (end of this document). You may need to use
different pixel values for width and height, but your image must be in portrait format, not landscape format.
Hyperlinks
1. Go to the following web page and read the following section: HTML Links.
https://www.w3schools.com/html/html_links.asp
2. For each Goal in your ordered list, replace some text (2-3 words at the most) with a link to a related webpage for that Goal. Unrelated links or links to search engines will be
deducted points. Test your links in Cloud9 Preview mode to ensure that the web page you link to actually opens in AWS. If not, see HINT after step 3 of this section.
3. For the fi rst three Bucket list items in your unordered list, replace some text (2-3 words at the most) with a link to a related webpage for that Bucket list item. Do not make your
entire text the link. Test your links in Cloud9 Preview mode to ensure that the web page you link to actually opens in AWS. If not, choose another web page to link to.
By default, browsers open a linked web page (URL) in the same window/tab as it was
clicked in. To force the linked web page to open in a new tab, use the target attribute with value “_blank” as shown below.
<a href="https://www.w3schools.com/" target="_blank">Visit W3Schools!</a>
4. Hyperlinked images - For your last two bucket list items (#4, #5) you will use an online open license image repository called Unsplash. Go to https://unsplash.com/, and type in the topic of your 4th bucket list item in the search bar.
On the search results scroll down until you fi nd a picture you like. Click on image to see it in full view. Then right click on the image and select “Open image in a new tab.” Once the image opens in the new browser tab, go to that tab and copy the URL (web address). Set the hyperlink attribute href attribute’s value for your fourth bucket list to the image’s URL. Repeat the process on https://unsplash.com/ to fi nd an image to use for your fifth bucket list item. The second image’s URL you will set as the href attribute’s value for your fifth
bucket list item.
Turn-in
Students will upload a single .zip file that contains: lab1.html, me.html, and image file in either .png, .jpg, or .jpeg format. Follow the instructions below.
1. Configure AWS to download .zip file as default
○ Instructions for this are at the end of this document in: Cloud9 - zip file set-up.
2. Download .zip file from AWS
● Select your lab 1 folder (in Cloud9) - for example: kflynn_lab1_section001. For Windows users right-click, for Mac press and hold down two fingers on the trackpad, until a drop down menu opens.
● Select Download from the menu. This will download a zipped archive file to
your local machine. Warning: Do not download your entire home folder. Only your lab 1 folder
● If a student’s Net ID was kflynn001, then the .zip file downloaded would be one of the following file names, depending on the lecture section.
○ kflynn001_lab1_section001.zip
○ kflynn001_lab1_section002.zip
○ kflynn001_lab1_section003.zip
3. Test HTML code from downloaded .zip file on local machine
● Locate the .zip file you downloaded from Cloud9 in the previous step and unzip its contents (extract lab 1 folder with contents).
Files downloaded from the web typically get saved by default to the Downloads, Desktop or Documents folder on your computer.
● Unzip the downloaded .zip file:
For Windows OS:
https://www.howtogeek.com/668409/how-to-zip-and-unzip-files-on-windows-10
For Mac OS:
https://www.howtogeek.com/672240/how-to-zip-and-unzip-files-and-folders-on-m ac/
● Verify unzipped files are correct:
○ Open lab1.html in a Chrome web browser. Visually inspect that your webpage displays correctly.
○ Open me.html in a Chrome web browser. Visually inspect that your webpage displays correctly.
○ Verify your image displays properly in me.html.
○ Is the image an appropriate size in relation to the web page content? If not, resize the image.
○ Verify your goals and bucket lists appear correctly in me.html.
○ Click on each of the hyperlinks in your goals and bucket lists to verify the correct web page is opened when followed.
4. Submit .zip file to Canvas:
○ Correct code in previous step - If your code passed all tests in the previous step (Test HTML code from downloaded .zip file on local machine), upload the .zip file on your local machine to Canvas Lab 1 turn-in.
If there were errors and you still have time before the deadline, go back to Cloud9 and continue working on lab 1. Seek help in office hours if you get stuck. Then repeat this Lab 1 Turn-in process from step 2 (Download .zip file from AWS).
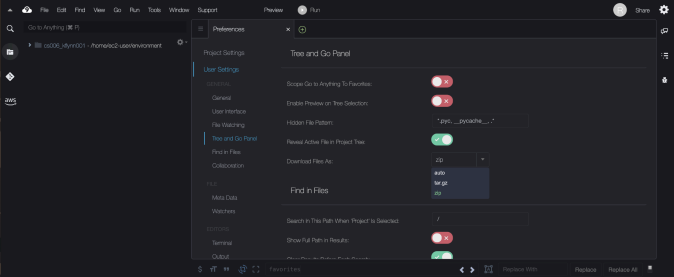
Cloud9 - zip file set-up
1. Open Cloud9 in AWS. Refer to the screen image below when completing the following steps.
2. Click on the Cloud9 icon (shape of a cloud) in the upper-left corner of the page (above home folder).
3. From the menu that opens select Preferences. This will open the Preferences settings menu in Cloud9.
4. In Preferences select User Settings (blue text).
5. In the User Settings section, select Tree and Go Panel (blue text below).
6. In the Tree and Go Panel section go to Download File As and change the drop down menu item to zip. By default the setting is auto (see menu below: auto, tar.gz, zip).
7. Click on the Cloud9 icon (shape of a cloud) in the upper-left corner of the page (above home folder).
8. From the menu that opens select Preferences. This will close the Preferences settings menu in Cloud9.
2024-01-18