CSE 438: Mobile Application Development
Hello, dear friend, you can consult us at any time if you have any questions, add WeChat: daixieit
CSE 438: Mobile Application Development
Lab 1: Shopping Calculator
Overview
In this lab, you will create a simple shopping calculator. It will only have one screen and limited functionality, but it should help you get comfortable with Xcode, UIKit, and Swift. Please read this entire document before getting started.
Please test opening your zip file on another computer to make sure the files are included properly. TA’s are not liable for broken submissions and the late penalty will apply.
Details
Due date: Wednesday, Sept 15, 11:59 PM CT
Grading: This lab is out of 50 points total. The exact point distribution is described in the “Requirements” section below.
Submission: Zip the entire project folder and submit it on Canvas. Please name the Xcode project “FirstNameLastName-Lab1”. Describe your creative feature as outlined in the “Creative Portions” section in a readme.txt file in your folder.
Description
This lab requires you to create your own app from scratch. Although many of the implementation details are left to you, there are some helpful guidelines and code snippets to get you started in the “Helpful Advice and Code Snippets” section below. Many of the topics covered in this lab have been discussed in lecture as well. Additional resources are available online in the Swift documentation and UIKit documentation that Apple provides.
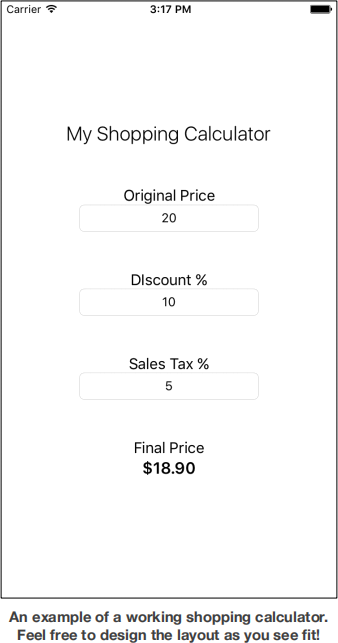
The goal of this lab is to create a simple shopping calculator that calculates the final price of a product based on its original price, the current discount percentage, and the local sales tax. The calculator should be easy to use. Everything should appear on the same screen, with labels and text fields that the user can edit. Whenever one of the fields is changed, the final price of the product should be updated.
Creative Portions
For each lab we will have you add features that improve the user experience and deepen your swift knowledge. These features are what we call the creative portion. This is your opportunity to add new feature(s) to your app that are interesting to you and not covered in the other requirements. Everyone is tasked with making a shopping calculator: how can you make yours truly stand out? This could involve totally changing the end behavior of your app.
If you’re struggling to come up what to implement, imagine yourself as a user and think about what you would want in the app. A good creative feature is original and it enhances the user experience. Feel free to search online for implementations of advanced features, but please do not directly copy-paste some lines of code you found online. An example of a bad creative feature is one that limits user functionality, such as replacing text fields with sliders.
In order to get full credit, the creative portion should be substantial enough to merit the amount of points listed. Compare the difficulty of implementation and the utility of your added feature of your feature to the other features in the requirements section. The goal of the creative portion is to add something new and different, not just re-hash existing requirements.
When submitting your lab it is your chance to “sell it to us.” The more you tell us about your app the better. As a minimum please tell us three things about your creative feature(s):
1. What you implemented
a. Include usage instructions if you think your feature is vague
2. How you implemented it
3. Why you implemented it
This format will be the standard moving forward. Please create a text file called readme.txt in your project folder and describe your creative feature there.
Grading Procedure
All labs will be graded in the simulator on an iPhone 12 Pro. The best practice is to make sure your layout works across all different device sizes, but for the purpose of this lab if your layout works on an iPhone 12 Pro screen, you are ok.
Requirements
[20 points] Users can input the original price, discount percentage, and sales tax percentage for a given product. Each of these fields has a corresponding label.
[5 points] Whenever a text field is changed, the final price of the product is updated live.
[5 points] The final price is correctly calculated (and rounded).
[5 points] The app behaves appropriately given any possible input.
[5 points] The layout of the app is clean and easy to use.
[10 points] Creative portion: Add one other small feature that improves your application.
Extra Credit
[5 points] Localize your app for another language (you can use Google translate!). Make sure to localize both the items in your Storyboard as well as any strings in your code that are exposed to the user (like error messages).
Helpful Advice and Code Snippets
It is going to be easiest to use the Storyboard for the layout of the app. Use your previous studio Xcode project for reference on how to add outlets and connections from the Storyboard to code. The built-in UIKit objects are sufficient to complete this lab — a combination of UILabel’s and UITextField’s should do the trick.
In order to update the final price of the product live, UITextField’s have an “Editing Changed” event, which can be connected to your code via an IBAction. It is not sufficient to have the final price update only when the editing finishes — the app should feel responsive even as the user is typing.
To round the final price to two decimal places, one method is to use the String’s format constructor like so:
let displayText = "$\(String(format: "%.2f", finalPrice))"
Consider what happens with various edge cases. What should be displayed when the text fields are empty, zero, negative, extremely large numbers, or not-numbers? This is up to you, but your choices should be sensible and not crash the app.
2021-09-14
Lab 1: Shopping Calculator