EE450 Programming Assignment 1 Fall 2023
Hello, dear friend, you can consult us at any time if you have any questions, add WeChat: daixieit
EE450 Programming Assignment 1
Fall 2023
Due Date: Wednesday September 27th, 2023, 11:59 PM (Midnight)
Hard Deadline
(Strictly Enforced: the submission website will automatically close on the deadline)
The objective of this assignment is to help you get familiar with error detection algorithm (i.e. cyclic redundancy check, CRC). It is an individual assignment, and no collaborations are allowed.
Any cheating will result in an automatic F in the course (not just in the assignment). If you have any doubts/questions, email TA your questions or come by TA’s office hours.
You can ask TAs any question about the content of the project, but TAs have the right to reject your request for debugging.
Background Knowledge:
When you send a sequence of bits (message) from one point to another on a datalink, you want to know that the message arrived correctly. A common form of insurance is to use an error detection scheme. Commonly used error detection approaches include CRC, Checksum, and Parity Check.
Cyclic redundancy check or CRC is a commonly used error detecting code. An X-bit CRC has the mathematical property of detecting all errors that occur in X or fewer consecutive bits, for any length of message. A single CRC can be associated with a large block of data, with a consequent savings in communications bandwidth.
Checksum is another approach of detecting errors in data transmission. One simple version is one-byte version of checksum. As an example, the ASCII number of ‘EE450’ is [69, 69, 52, 53, 48]. The one-byte checksum method will sum these numbers, divide it by 256. As a result, the remainder(R) is 35 and quotient(Q) is 1. Add Qto R and then take 1’s complement of that number which is same as subtracting it from 255. Thus, the one-byte version of internet checksum is 219. If the sum (Q+R) exceeds 255, then divide the sum (Q+R) by 256 and get new quotient Q’ and remainder R’, then adding Q’ to R’, take 1’s complement of the number to get the one-byte version of internet checksum. Once some errors happen, ‘EE450’ changes to ‘E?450’ which corresponds to [69, 33, 52, 53, 48]. Suppose the checksum does not change, the receiver proceeds the similar process. The receiver finds the resulting checksum (0) mismatch with the checksum (219) received. It decides not to accept that data.
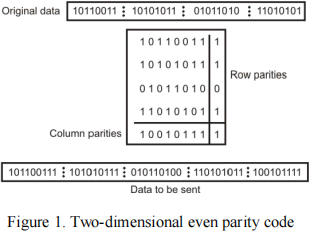
Two-dimensional (2D) parity check is also a powerful error detecting method. One simple version is one- byte version of 2D parity check. As is shown in Figure 1, the original data is segmented into bytes, i.e., 8 bits blocks. A parity value is computed for each row and for each column. In the transmitter side, each row parity is concatenated at the end of the corresponding byte, and the column parties are attached to the end of the transmitting data. In the receiver side, the data will be divided into blocks with 9 bits and check both the row parities and the column parities. The parity of both the column and the row containing the flipped bit will be detected.
Problem Statement:
In this project, you are required to implement and evaluate the performance of the three types of error detection approaches. We will simulate the process of sending data, transmitting data with errors introduced, and receiving the data with error detection.
The workflow is:
1. Read data to be sent from the given data file.
2. Calculate and the check codes (CRC, Checksum, Parity) for each data.
3. Append the check codes to the data following the corresponding rules.
4. Introduce the random bits error (given in the data file).
5. Check the received polluted data using the three error detection approaches.
6. Print whether the received data would be accepted (pass) or not (not pass).
Data File
We provide a data.txt file that includes the data to be sent and the errors introduced during transmitting. Each line includes a binary data and the error bits, separated by a space, examples are shown below.
|
10011010110101111100001100 01011100111010110101111000 … … |
000010000010000000000010000010 100010000000000100000101000000 |
Note that the error bits are introduced to the sending codeword, rather than the original data. This means you should first process the binary data with check codes (adding CRC, checksum, or parity), then introduce the errors.
To introduce the random bits error, do XOR operation to the codeword: if it is 0, there is no error at the position; if it is 1, the bit of the codeword will be flipped. We will apply left alignment for the error bits with the codeword, meaning that comparison starts from the leftmost bit of both the codeword and the error bit, and the error introducing process stops if either one reaches the end.
How errors will be introduced:
Codeword: 10011010110101111100001100
Error bit: 000010000010000000000010000010
Codeword with errors (left alignment): 10010010111101111100000100
Part 1: CRC
In this project, you are required to implement and evaluate the performance of two types of CRC codes: CRC-8 and CRC- 16.
CRC-8 generator: x8 + x5 + x4 + 1= 1 0011 0001
CRC- 16 generator: x16 + x12 + x5 + 1 = 1 0001 0000 0010 0001
You need to calculate and print out the CRC remainder pattern for transmitting the codeword. Then the
receiver will print out the decision whether the received data should be accepted (Pass) or not (Not pass).
|
Data:0011001111110010010001010110110100001010111100111100010011111100 Error:000000000000001100000000000000000000000000000000001100000000000000000000 |
|
|
CRC-8 CRC: 11111100; CRC-16 CRC: 1111011011001111; |
Result: Not Pass
Result: Not Pass |
Part2: Checksum
Using one-byte version of checksum, you are required to calculate and print the checksum value in
binary. Then, after introducing errors to the transmitting codeword, print out the decision result of error detection using checksum.
|
Checksum Checksum: 01100111; |
Result: Not Pass |
Part3: Parity2D
Using one-byte version of 2D parity check, you are required to calculate and print the column parity and row parity. In input data are all 64-bit, leading to eight 8-bit blocks. We will calculate the column parity first and get the 8-bit parity for each raw data blocks. Then, we will consider the column parity as an extra row and calculate the row parity for all the 9 blocks, leading to a 9-bit row parity. You should print the column and row parities in the following format, then print out the decision result of error detection for the receiving polluted data using 2D parity check.
|
2D Parity Col: 00101000; Row: 011100100; |
Result: Pass |
Code Files
Your implementation should include the code files described below:
1. Error detection source code: you must name your code file: error_detection.c or error_detection.cc or error_detection.cpp (all small letters).
2. Head file: you must call the corresponding header file (if you have one; it is not mandatory) error_detection.h (all small letters).
3. Makefile: you should use a “Makefile” to compile and run your program.
TA will compile and run your codes using make all. It should automatically compile and run your program and print the results.
Makefile tutorial:
https://www.cs.swarthmore.edu/~newhall/unixhelp/howto_makefiles.html![]()
README File
Along with your code files and the Makefile, include a README file in text. In the README file you should include:
1) Your Full Name as given in the class list
2) Your Student ID
3) The platform you use (the ubuntu version)
4) What you have done in the assignment.
5) What your code files are and what each one of them does. (Please do not repeat the project description, just name your code files and briefly mention what they do).
6) Any idiosyncrasy of your project. It should say under what conditions the project fails, if any.
7) Reused Code: Did you use code from anywhere for your project? If not, say so. If so, say what functions and where they're from. (Also identify this with a comment in the source code.)
Example Output Formatting
|
student@ubuntu:~/ee450 /pa1$ make all g++ error_detection.cpp -o error_detection -g ./error_detection ========================== Data:1000100101101001101001010111000111011010110101011001001000001100 Error:000000000000000000000000000000000000000000000000000000000000000000000000 CRC-8 CRC: 10101010; Result: Pass CRC-16 CRC: 1101100001101001; Result: Pass 2D Parity Col: 10100101; Row: 100011100; Result: Pass Checksum Checksum: 10100110; Result: Pass ========================== Data:1001100011001100011001100011001100010000000000000000000000000000 Error:000000000000000000000000000000000000000000000000000000000000000100110001 CRC-8 CRC: 00000000; Result: Pass CRC-16 CRC: 1101000111110011; Result: Not Pass 2D Parity Col: 00010001; Row: 100010000; Result: Not Pass Checksum Checksum: 11110000; Result: Not Pass
… … |
Assumptions:
If you need to have more code files than the ones that are mentioned here, please use meaningful names and all small letters and mention them all in your README file.
Requirements:
1. Your programs should terminate itself after all done.
2. All the naming conventions and the on-screen messages must conform to the previously mentioned rules.
3. All the on-screen messages must conform exactly to the project description. You should not add anymore on-screen messages. If you need todo so for the debugging purposes, you must comment out all the extra messages before you submit your project.
Programming platform and environment:
1. All your submitted code MUST work well on the provided virtual machine (Ubuntu 20.04 or Ubuntu 22.04).
2. All submissions will only be graded on the provided Ubuntu. TAs won’t make any updates or changes to the virtual machine. It’s your responsibility to make sure your code is working on the provided Ubuntu. “It works well on my machine” is not an excuse. SeekTA’s help if you are having difficulty by going to office hours or make an appointment.
3. Your submission MUST have a Makefile. Please follow the requirements in the following “Submission Rules” section.
Programming languages and compilers:
You must use only C/C++ on UNIX.
You can use a unix text editor like emacs or gedit to type your code and then use compilers such as g++ (for C++) and gcc (for C) that are already installed on Ubuntu to compile your code. You must use the following commands and switches to compile yourfile.cor yourfile.cpp. It will make an executable by the name of "yourfileoutput” .
gcc -o yourfileoutput yourfile.c
g++ -o yourfileoutput yourfile.cpp
Do NOT forget the naming conventions mentioned before!
Submission Rules:
Along with your code files, include a README file and a Makefile. Submissions without README and Makefile will be subject to a penalty.
1. Files your need to submit includes: a source code file, a head file (if applicable), a Makefile, and README. Do not submit the given data.txt file. We will test on a different dataset.
2. Compress all your files including the README file into a single “tar ball” and call it: ee450_PA1_yourUSCusername.tar.gz. Please make sure that your name matches the one in the class list. Here are the instructions:
a. On your VM, go to the directory which has all your project files. Remove all executable and other unnecessary files. Only include the required source code (head) files, Makefile and the README file.
b. Use these commands in the terminal to compress your files into atar ball:
tar cvfee450_PA1_yourUSCusername.tar *
gzip ee450_PA1_yourUSCusername.tar
Now, you will find a file named “ee450_PA1_yourUSCusername.tar.gz” in the same directory. Please notice there is a space and a star(*) at the end of first command.
c. Do NOT include anything not required in your tar.gz file. Do NOT use subfolders. Any compressed format other than .tar.gz will NOT be graded!
2. Please consider all kinds of possible technical issues and do expect a huge traffic on the blackboard website close to the deadline which may render your submission or even access unsuccessful. So, don’twait till the last minute to submit.
3. Please DO NOT wait till the last 5 minutes to upload and submit because some technical issues might happen, and you will miss the deadline. And a kind suggestion, if you still get some bugs one hour before the deadline, please make a submission first to make sure you will get some points for your hard work!
4. After receiving the confirmation email, please confirm your submission by downloading and compiling it on your machine. If the outcome is not what you expected, try to resubmit, and confirm again. We will only grade what you submitted eventhough it’s corrupted.
Grading Criteria:
Notice: We will only grade what is already done by the program instead of what will be done.
Your project is graded for 100 points and your grade will depend on the following:
1. Correct functionality.
2. Inline comments in your code. This is important as this will help in understanding what you have done.
3. Whether your programs work as you say they would in the README file.
4. If your submitted codes, cannot be compiled, you will receive 10 out of 100 for the project.
5. If your submitted codes compile using make but when executed, produce runtime errors without performing any tasks of the project, you will receive 15 out of 100 for the project.
6. If you forget to include the README file or Makefile in the project tar-ball that you submitted, you will lose 15 points for each missing file (plus you need to send the file to the TA in order for your project to be graded.)
7. Do not submit datafile used for test, otherwise, you will lose 5 points.
8. The minimum grade for an on-time submitted project is 10 out of 100, assuming there are no compilation errors and the submission includes a working Makefile and a README.
9. There are no points for the effort or the time you spend working on the project or reading the tutorial. If you spend about 2 weeks on this project and it doesn’t even compile, you will receive only 10 out of 100.
10. Your code will not be altered in any way for grading purposes and however it will be tested with different inputs. Your TA runs your project as is, according to the project description and your README file and then check whether it works correctly or not. If your README is not consistent with the description, we will follow the description.
Cautionary Words:
In view of what is a recurring complaint near the end of a project, we want to make it clear that the target platform on which the project is supposed to run is the provided Ubuntu. It is strongly recommended that students develop their code on this virtual machine. In case students wish to develop their programs on their personal machines, possibly running other operating systems, they are expected to deal with technical and incompatibility issues (on their own) to ensure that the final project compiles and runs on the requested virtual machine. If you do development on your own machine, please leave at least three days to make it work on Ubuntu. It might take much longer than you expect because of some incompatibility issues.
Academic Integrity:
All students are expected to write all their code on their own.
Copying code from friends is called plagiarism not collaboration and will result in anF for the entire course. Any libraries or pieces of code that you use, and you did not write must be listed in your README file. All programs will be compared with automated tools to detect similarities; examples of code copying will get anF for the course. IF YOU HAVE ANY QUESTIONS ABOUT WHAT IS OR ISN’T ALLOWED ABOUT PLAGIARISM, TALK TO THE TA. “I didn’t know” is not an excuse.
2023-09-27