CS5331 – Web Security Homework 1
Hello, dear friend, you can consult us at any time if you have any questions, add WeChat: daixieit
CS5331 – Web Security
Homework 1: Basis of the web software stack
Due date & time: Due at 23:59 on February 7, 2023. This is a firm deadline. This project MUST be finished independently.
1. Introduction
This assignment is designed to get your hands on the main components of the web software stack. The system experience and insight will be the focus of this module.
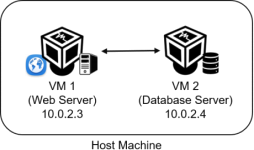
Your objective is to set up WordPress from scratch and finish code for iFrame communication. This application should be installed on two virtual machines where VM1 is used as a web server and, VM2 is used as a database server. Specifically, the web server talks to a static frontend, and the database will store all WordPress data. You can access the web application by the browser in the VM1. The overall architecture is presented below. You will use VirtualBox to set up two virtual machines on your host machine (personal laptop).
2. Tasks
You will carry out the first three required tasks. Task 4 is optional.
Task 1. Setup the web application environment
Task 2. Finish code for iFrame communication
Task 3. Analyze the web application
2.1. Task 1 (2 mark) Setup your web environment
First, create two virtual machines and set up Ubuntu 20.04 as the environment. You can use your preferred Virtual Machine software and set up your own VM (Ifyou use Apple Silicon Macs, you can use UTM). For VirtualBox, we also provide an OVA file with pre-installed
Ubuntu virtual machine. Please find the Google driver link below to access the OVA file:
https://drive.google.com/file/d/1le06tR-wKsgPNN9IP23kjPs1ss9B6osf/view
The login (root) password is student. Here is a guide to import ova files in Virtualbox:
https://www.maketecheasier.com/import-export-ova-files-in-virtualbox/. Second, you need
to set up the network of each VM as "NATNetwork". Please find the link below as a reference
for NAT Network setup https://www.techrepublic.com/article/how-to-create-multiple-nat- networks-in-virtualbox/ .
After the network set-up, you should check each VM’s IP address by Linux command ifconfig. If you use the default 10.0.2.0/24 Network CIDR, your VMs’ IP addresses will be 10.0.2.*. We take 10.0.2.3 (Web Server) and 10.0.2.4 (Database Server) as examples in the overall architecture.
Once that is set up, you will require a few software packages to get up and running with the
reference implementation. The following links are instructions to configure the environment.
• Install LAMP stack: https://www.digitalocean.com/community/tutorials/how-to- install-linux-apache-mysql-php-lamp-stack-on-ubuntu-20-04
• Install WordPress:https://wordpress.org/support/article/how-to-install-wordpress/
We have prepared detailed commands based on the above instructions as your alternative reference, but make sure you understand what a command means before you execute it!
A. Database Server (IP: 10.0.2.4):
1. Install MySQL
$ sudo apt update
$ sudo apt install mysql-server
2. Login MySQL and create a new database for WordPress
$ sudo mysql -u root
CREATE DATABASE wordpress;
CREATE USER ‘wpuser’@‘%’ IDENTIFIED BY ‘***’; (Replace ***
with your own password)
GRANT ALL PRIVILEGES ON wordpress.* TO 'wpuser'@'%';
FLUSH PRIVILEGES;
QUIT;
3. Modify MySQL configuration to support remote login
comment out “Bind-address: 127.0.0.1” in /etc/mysql/mysql.conf.d/mysqld.cnf
4. Restart MySQL
$ sudo service mysql restart
5. Check new user status
$ mysql -u wpuser -p
Enter password: (input previously defined password)
mysql> status
mysql> exit
B. Web Server (IP: 10.0.2.3):
1. Install Apache2, PHP, PHP-MySQL
$ sudo apt update
$ sudo apt install apache2 php php-mysql libapache2-mod-php mysql-client
$ sudo service apache2 restart
2. Check Apache2 installation
Open a website in Firefox with the URL: localhost/index.html
3. Verify remote MySQL login:
$ mysql -u wpuser -h 10.0.2.4 -p
Note: if you cannot login the database, maybe it is because the MySQL in the database server does not listen on the default port: 3306
4. Install WordPress
$ $ $ $
wget https://wordpress.org/wordpress-5.3.2.zip
unzip wordpress-5.3.2.zip
sudo cp -r wordpress /var/www/html
sudo chown -R www-data:www-data /var/www/html
5. Config WordPress and create a user for developing the memo website
Open a website with URL: http://localhost/wordpress/index.php
Use following configuration information to setup WordPress:
Database: wordpress
User: wpuser
Password: *** (input previously defined password in the database server)
Database Host: 10.0.2.4 (replace with your database server VM’s IP address)
6. WordPress user check in MySQL
$ mysql -u wpuser -h 10.0.2.4 -p
show tables from wordpress;
use wordpress;
select * from wp_users;
What to submit:
Please submit a screenshot of the WordPress dashboard visited from the browser in the web server VM and a screenshot of the wp_users table (in MySQL) in the database server.
2.2 Task 2 (4 marks) Finish codefor iFrame communication
In this task, you will design a new page in WordPress using JavaScript. From the WordPress dashboard, use the ‘add pages’ link on the left column with ‘code editor’ mode to start your
implementation.
We have provided incomplete code below.
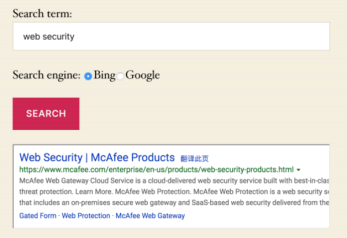
Search term: <input type="text" name="text1" id="text1">
Search engine: <input type="radio" id="bing" name="search_engine" value="1" checked="checked">Bing <input type="radio" id="google" name="search_engine" value="2">Google
<button name="Search" onclick="alert('hello world');">Search</button>
<iframe src="https://nus-cs5331.github.io/search.html" id="frame1"
height="400"></iframe>
Copy and paste the above as the page content of your new page. Once you publish it, it will generate the following page, allowing users to input search contents and select the search engine, and generate the search results in an iFrame. An example is provided below. Note that users need to refresh the page to continue the next search.
The page is not fully functioning. Your task is to replace the highlighted code “alert(‘hello world’ );” with your own code, so that the selection ofthe Bing search
engine can work. It sends the search term and engine selection to the page hosted in the iFrame:
‘https://nus-cs5331.github.io/search.html’ . You need to read the search.html page’s source
code to know what its JavaScript code is expecting. You will use the postMessage function
for sending the expected data. Please use this link as a reference for postMessage usage in a
similar situation:https://robertnyman.com/html5/postMessage/postMessage.html.
What to submit:
1. Please submit the JavaScript code you wrote as a separate file named onclick-handler.js and a screenshot of your page that shows the search results of "National University of Singapore” . During grading, we will copy the entire content of your onclick-handler.js to replace the
highlighted code “alert(‘hello world’);” to test the functionality.
2. If you choose Google as the search engine, what do you observe? Attach a screenshot and explain the observation.
2.3. Task 3 (4 marks) Analyze the web application
Please describe the DOM tree of the page you created in the above step . Please also describe the sequence of web-related events (such as JavaScript activity or HTTP requests) after you click the ‘search’ button in the page.
(Optional, Non-Graded) Task 4: Build Chromium browser or Android (including the WebView component) from source code.
You can either choose the Chromium browser or the Android system. Your task is to get the source code, and build it from scratch. To access the VMs from your host machine, you need one extra step of port forwarding in the VirturalBox virtual machine. Please contact us if you need help.
Chromium
Brower:https://chromium.googlesource.com/chromium/src/+/master/docs/linux/build _instructions.md
Android System:
https://source.android.com/setup/start
neo/Advanced_Topics/Compile_Android_From_Source.html
3. Submission.
The submission will be made into Canvas’s assignment section as a single .zip file. Please name this file with your student number and hw1 (e.g. A19930314-hw1.zip). Inside the .zip file, there should include a report file (PDF, up to 3 pages) and a .js file called onclick-handler.js. Also, please INCLUDE your name and student ID in the report.
Note that we only accept the following formats for compressed
file: .zip, .tar.gz, .tar.bz, and .tar.bz2. Also, please make sure your report does not EXCEED 3 pages, excluding references and appendices.
For any question, contact the teaching assistantcs5331ta@googlegroups.com. Hope you can have fun exploring the web software stack from this assignment. It also helps you to choose your final project topic.
2023-04-25
Basis of the web software stack