CS 522—Mobile Systems and Applications—Spring 2023
Hello, dear friend, you can consult us at any time if you have any questions, add WeChat: daixieit
CS 522—Mobile Systems and Applications—Spring 2023
Assignment Two—Chat App UI
In the next several assignments, we are going to be developing a pair of chat apps that communicate in a peer-to-peer fashion. One app is a chat client, that only sends messages, while another app is a chat “server” that collects messages from the clients. For example, this might be used in a “treasure hunt” where hunters are divided into teams, and members of a team communicate with the team leader through the chat app. We will have to learn some more Android before we can develop this into an app that supports bidirectional communication (from a team leader to team members).
Develop an app that targets the API version 33 of the Android platform for your submission for this assignment (also set minSdkVersion to 26). Set the targetSdkVersion and the compileSdkVersion to API 33. Test your assignment on emulated devices of your choice. You should also customize the name of the app in the title bar, with your own name.
You will complete two apps so that they will speak to each other peer-to-peer using UDP sockets. These apps are very simple and violate some of the design guidelines for Android apps, such as not performing network communication on the main thread. We will see later how to fix this.
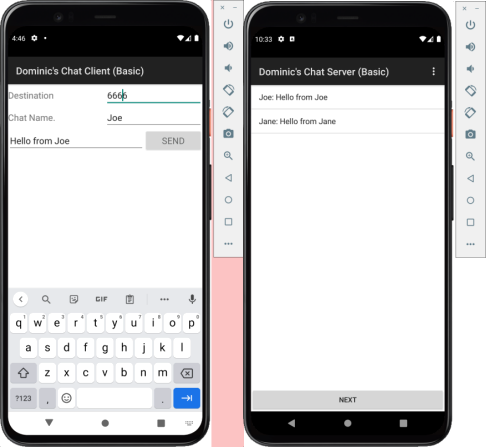
You are provided with two apps. ChatServer has a single button, Next. When you press it, it waits to receive a UDP datagram packet from the network on a designated port, and appends the message in the packet to a list of messages that are displayed on the screen. ChatClient has a message editor window and a button, Send. When you press SEND, the contents of the message edit window are sent to the server.
On real devices, the client and server apps might communicate by broadcasting over a Bluetooth or WIFI network that they are both connected to. Since the emulator does not implement the WIFI1 or Bluetooth stacks, for the sake of this assignment we will just have the server bind to a server port, and the client then sends messages to that port. For machine addressing, the client will send to the loopback interface for the host machine on which both the client and server AVDs execute, and adb will then redirect messages to the server UDP port on the host machine to the corresponding port on the server AVD.
Every message that the client sends will include metadata, including the name of the sender. Currently the name is specified in the client UI. Eventually, in a future assignment, you will add an activity that allows this name to be defined as part of a registration process for the app.
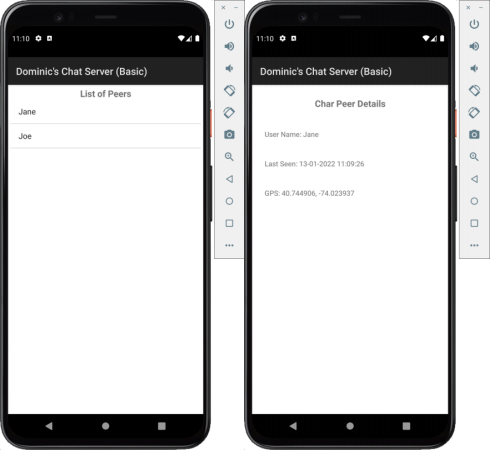
In addition, provide another UI ViewPeersActivity in the chat server (accessible using the options menu from the action bar) for displaying a list of the peers. This UI just lists peers by name in a list view. The list of peers is maintained in the main chat server activity, and is passed to the subactivity for displaying the list of peers as a parcelable array list extra.
If the user selects one of these peers, then provide in a third UI ViewPeerActivity information about that peer (their currently known GPS coordinates, and the last time that a message was received from that user). The GPS coordinates are part of the metadata that is transmitted with every message. For now, they are just declared as constants in the chat client. If we have time later in the course, we will add functionality for tracking the location of a device. The information about the peer that is chosen is passed as a parcelable extra to this third UI.
Make sure that the output is properly formatted, and that you follow best practices in localizing the user interface. For example, these string templates are provided for displaying peer information in ViewPeerActivity:
<string name="view_user_name">User Name: %s</string>
<string name="view_timestamp">Last Seen: %s</string>
<string name="view_location">GPS: %f, %f</string>
You can instantiate these templates with information from the messages, e.g.:
getString(R.string.view_location, peer.latitude, peer.longitude)
To prepare for future assignments, and to get some practice with parcels and the Parcelable interface, define entity classes that contain the interesting state about messages and chat peers. Define these in an entities subpackage of your app. You have two kinds of entities: a message and a peer (message sender):
public class Message implements Parcelable {
public long id;
public String chatroom;
public String messageText;
public Date timestamp;
public Double latitude;
public Double longitude;
public String sender;
}
public class Peer implements Parcelable {
public long id;
public String name;
public Date timestamp;
public Double latitude;
public Double longitude;
}
All of these entity objects should implement the Parcelable interface. This involves writing a method that writes the state of the entity object to an output parcel, and a constructor that reconstitutes the state of an entity from an input parcel. Also complete the implementation of the CREATOR static field for the entity class, that implements the Parcel.Creator<Peer> interface. The library you are provided with includes utilities that you will find helpful, for reading and writing information such as dates.
You should follow this strategy to get the client and server to talk to each other:
1. Create separate virtual devices (AVDs) for the client and server. Let’s say you call these ChatClient and ChatServer, respectively.
2. In the Android Studio editor for the ChatClient project, choose the ChatClient device from the drop-down menu for selecting the device to run on (AS should connect the Android debugger to that emulator for the logcat window):
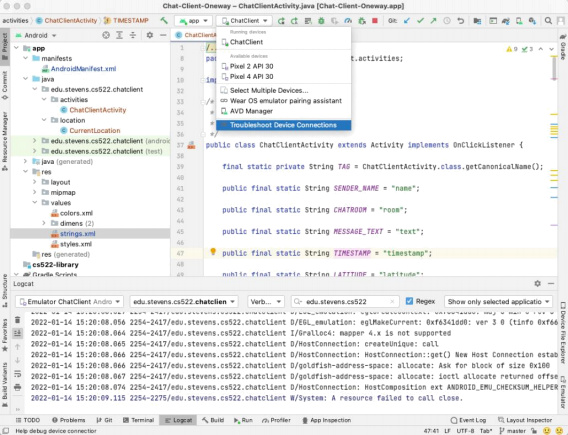
3. Similarly, make sure that the chat server app runs on the ChatServer device.
4. Run the server and client chat apps. Assuming that you ran the client first, followed by the server, the corresponding AVDs have administrative port numbers 5554 and 5556, respectively.
The apps are not yet communicating, because they are running on their own network stacks. The apps are using the following library interface to communicate:
public interface IDatagramConnection {
public void receive(Datagram packet);
public void send(Context context, Datagram packet;
public void close();
}
The client uses the send operation to send a message, while the server uses the receive operation to receive a message, waiting if no message is ready yet. The close operation is used to free up network resources (e.g. unbinding from a network port). A datagram has string data and a string address (source or destination, depending on context). There are three possible implementations of this interface for you to use.
Option 1: UDP communication
This is the choice that is the most appropriate for this type of application. It is lightweight, since we do not attempt to detect and correct lost packets. The server binds to the default UDP port for the application:
int port = getResources().getInteger(R.integer.app_port);
DatagramConnectionFactory factory = new DatagramConnectionFactory();
IDatagramConnection serverConnection = factory.getUdpConnection(port);
The destination address on the client specifies the UDP port on the server to which messages should be sent, which should always be 6666:
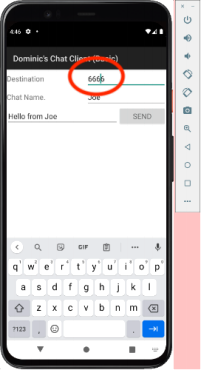
The server has bound to a UDP port on the server guest machine. How do we connect these two virtual machines, that are running on their own virtual networks? You need to bind the server UDP port to a UDP port on the host machine upon which you’re running these two AVDs. This is easy to do. The server binds to UDP port 6666 on its guest Ethernet interface (10.0.2.15). The default destination network address for packets in the UDP implementation of DatagramConnection will send packets to the host loopback interface (10.0.2.2 on the AVD, 127.0.0.1 on the host machine). You now need to forward packets sent to that address on the host machine, to the server port on its virtual machine. You will telnet to the console of the server emulator and redirect UDP traffic sent to port 6666 to the same port on the emulator. Use the console port for emulator- 5556 (the chat server device, if you started it second) in this.
telnet localhost 5556
Then authenticate with your emulator authorization token2 , and execute the redir command on the emulator console to forward UDP packets sent to port 6666:
auth auth-token
redir add udp:6666:6666
You can find out more about network redirection here:
https://developer.android.com/studio/run/emulator-networking.html#connecting
Option 2: TCP communication
TCP is a poor choice for this kind of application, because of the overhead of setting up and tearing down a TCP connection for a small chat message. It is provided because there are known bugs with the UDP stack on the Android emulator. The approach is broadly similar to that above for UDP, except specifying the TCP IDatagramConnection implementation:
IDatagramConnection serverConnection = factory.getTcpConnection(port);
To set up TCP forwarding, use the adb command in the platform-tools subdirectory of the Android installation3 to perform this redirection, by typing these lines in the OS (bash or Windows) shell:
adb devices -l
adb -s emulator-id emu avd name
adb –t transport-id forward tcp:6666 tcp:6666
The first command lists the devices connected to adb, including their transport identifiers. The second command provides the name of the emulator from its identifier (e.g. emulator-5554, emulator-5556, etc), and is useful as a reality check. The third command forwards packets sent to TCP port 6666 on the host machine to TCP port 6666 on the device identified by the transport identifier. Use the transport id for emulator-5556 (the chat server device, if you started it second) in the third command.
The implementation of the TCP stack on the Windows emulator has a bug where a packet is sometimes received with no data. The code for receiving a packet on the server should detect this and return immediately if it happens:
serverConnection.receive(receivePacket);
if (receivePacket.getData() == null) {
Log.d(TAG, "....no data, skipping....");
return;
}
The client will have to (manually) resend the packet if this happens. The frequency with which this happens is nondeterministic.
Option 3: SMS communication
SMS is not a strange choice for sending chat messages, there are numerous apps that add additional functionality atop SMS and MMS (e.g., Signal for secure messaging). An SMS implementation is provided here because of the issues with UDP and TCP4 . The constructor for this implementation is slightly different, requiring a context to obtain access to SMS resources:
IDatagramConnection serverConnection = factory.getSmsConnection(this);
Now when the client specifies a destination for a message, it specifies a “telephone number” to which the SMS message should be sent. On the emulator, you can use the adb port number for the target emulator as the destination. For example, assuming the server is identified as emulator-5556, you would specify 5556 as the destination:
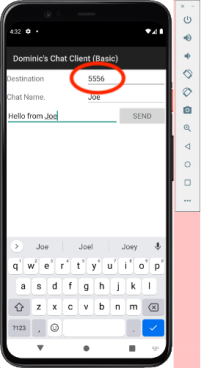
The library you are provided with requests permissions for SMS and network access. Unlike network permissions, SMS permissions are not granted when the app is installed. Instead, you need to specifically grant SMS permissions to both the client and the server apps:
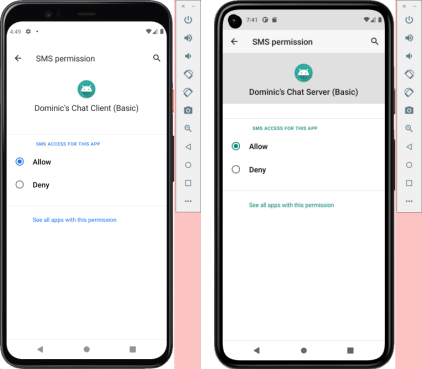
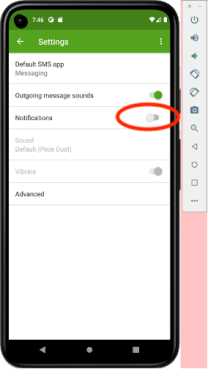
If you use the messaging app on the client or server device, you can see the SMS messages that are exchanged. When you receive a text message on the server, you will also receive a notification. You should turn off text message notifications to prevent this:
If the code for receiving a packet on the server executes on the main thread (which it does for this and some subsequent assignments), the operation will not block waiting if a packet has not yet been received. This is because receipt of SMS messages is processed by a broadcast receiver, which must execute on the main thread. If this thread is blocked, the broadcast receiver cannot execute and the system becomes deadlocked. In a later assignment, receipt (and sending) of packets will be done on background threads, as is required for Android. For the moment, the following code on the server for receiving a packet gives up if nothing is currently available:
serverConnection.receive(receivePacket);
if (receivePacket.getData() == null) {
Log.d(TAG, "....no data, skipping....");
return;
}
The server app is just an observer of SMS messages, that are processed by the main messaging app. You may make the server app the default messaging app, but do not do this on anything except a development device, since it is missing critical functionality for the default messaging app. Note that the Play Store forbids use of SMS permissions unless an app is a default messaging app.
Library Module
The client and server apps include some functionality in an external module, imported as an AAR file5 . The settings.gradle file should include this line:
include ':app', ':cs522-library'
The build.gradle file for the app should include these dependencies:
implementation project(":cs522-library")
implementation 'com.google.guava:guava:28.1-android'
Note: You must make sure to declare in the manifest the permissions that the app will require. The library already declares permissions for network and SMS access. You will need to declare other permissions in later assignments, when chat messages are persisted.
Submitting Your Assignment
Once you have your apps working, please follow these instructions for submitting your assignment:
1. Create a zip archive file, named after you, containing a directory with your name. E.g. if your name is Humphrey Bogart, then name the directory Humphrey_Bogart.
2. In that directory you should provide the Android Studio projects for your apps.
3. Also include in the directory a completed rubric for your assignment. This is to help you self-evaluate, though a falsified rubric is grounds for (potentially significant) penalty points.
4. You should also include the APK (Android Package) files for your applications, generated by Android Studio, package up your application for installation on a device. These are the files app/build/outputs/apk/debug/app-debug.apk in each project (Rename these appropriately and put them in the root folder of your submission).
5. In addition, record short MP4 videos (note the allowable format) demonstrating your deployments working. Make sure that your name appears at the beginning of the video. For example, put your name in the title of the app. Do not provide private information such as your email or cwid in the video. Be careful of any “free” apps that you download to do the recording, there are known cases of such apps containing Trojan horses, including key loggers.
6. Your video should record client devices sending multiple messages and those messages being received on the server. You can use one client device to send messages with different chat names. Include both client and server devices, running on the emulator, in a video. Show the server list of peers subactivity being launched, and the details for a single peer activity being launched from this.
Your solution should be uploaded via the Canvas classroom. Your solution should consist of a zip archive with one folder, identified by your name. Within that folder, you should have two Android projects, for the apps you have built, as well as the completed rubric and videos demonstrating your app working.
2023-01-30